Nord VPN on yksi vanhoista toimijoista VPN-maailmassa, ja sen Windows-sovellusta pidetään parhaimpana PC-maailmassa. Nord VPN on hyvin monipuolinen, jos puhutaan sen toiminnallisuudesta ja joustavuudesta. Alustojen välisen tuen lisäksi sillä on myös erilaisia palvelimia eri maissa, joista voit valita.

Huolimatta siitä, että sovellus on ollut markkinoilla pitkään, käyttäjät ilmoittavat, että he eivät pysty muodostamaan yhteyttä Nord VPN: ään. Se joko lopettaa yhteyden mahdollisen päivityksen jälkeen tai DNS-palvelimille lähetetty pyyntö joko palauttaa aikakatkaisuvasteen.
Miksi Nord VPN ei muodosta yhteyttä?
Koska VPN käyttää koko tietokonejärjestelmän Internet-arkkitehtuuria, on useita syitä, miksi Nord VPN -laitteesi ei välttämättä pysty muodostamaan yhteyttä oikein. Jotkut näistä on lueteltu alla.
- IPv6: Ilmeisesti Nord VPN ei tue IPv6-protokollaa missään viestinnässä. Joten jos tämä on käytössä, et ehkä pysty muodostamaan yhteyttä.
- Kolmannen osapuolen ohjelmat: Kolmansien osapuolten ohjelmien tiedetään olevan ristiriidassa ohjelmistojärjestelmän kanssa ja kilpailevat resursseista; siten, että se ei muodosta yhteyttä oikein.
- Verkkosovitin: Koska Nord käyttää erillistä verkkosovitinta yhteydenpitoon Internetin kanssa, voi olla, että verkkosovitin ei toimi kunnolla ja sinun on käynnistettävä se uudelleen.
- Virhe verkossa: Joskus tietokoneen verkkokokoonpanot saattavat olla virhetilassa, mikä ei aiheuta yhteyttä ollenkaan. Voimme yrittää päivittää kaikki muuttujat tässä tapauksessa.
Ennen kuin aloitamme ratkaisujen kanssa, sinun on varmistettava, että Internet toimii todella . Jos Internet ei toimi kunnolla, Nord ei pysty luomaan kunnollista yhteyttä ja antamaan sinulle pääsyn tunneloituun verkkoon.
Varmista, että käytät yksityistä verkkoa (ei koulua, työpaikkaa tai julkisia paikkoja, kuten sairaalat), eikä valtakirjoja ole mukana. Kun olet tarkistanut, että Internet toimii oikein, jatka.
Ratkaisu 1: IPv6: n poistaminen käytöstä
IPv6 (Internet Version Protocol 6) on viimeisin IP-versio tietokoneen verkkoarkkitehtuurissa. Oletuksena käytämme edelleen IPv4: ää, emmekä ole vieläkään siirtyneet IPv6: een pysyvästi. Siellä voi kuitenkin olla joitain, jotka ovat aloittaneet IPv6: n käytön Internet-yhteyksissä. Vaikuttaa siltä, että IPv6 ei toimi kunnolla Nord VPN: n kanssa. Siksi poistamme sen käytöstä ja tarkistamme uudelleen.
- Napsauta hiiren kakkospainikkeella tehtäväpalkissa olevaa verkkokuvaketta ja valitse Avaa verkko- ja Internet-asetukset . Napsauta nyt vaihtoehtoa Muuta sovittimen asetuksia.

- Kun olet sovittimen asetuksissa, napsauta hiiren kakkospainikkeella käyttämääsi sovitinta ja valitse Ominaisuudet .
- Kerran adapteri ominaisuuksia, poista IPv6 vaihtoehto ja varmista, että IPv4 on käytössä. Tallenna muutokset ja poistu. Käynnistä tietokone uudelleen ja tarkista, onko virhe korjattu ja pystytkö muodostamaan yhteyden Nord VPN: ään.

Ratkaisu 2: Kolmannen osapuolen sovellusten tarkistus
On olemassa lukuisia muita sovelluksia ja ohjelmia, jotka näyttävät olevan ristiriidassa Nord VPN: n kanssa sen toiminnassa. Jos resursseja yrittää käyttää useampia kuin yksi sovellus, kilpailutilanne on olemassa, eivätkä ne toimi odotetulla tavalla.

Sinun pitäisi tuoda tehtävienhallinta (Windows + R ja 'taskmgr') ja tarkistaa kaikki taustalla käynnissä olevat sovellukset. Yksi tällainen sovellus, jonka tiedettiin aiheuttavan ongelmia, oli Glasswire Elite . Varmista, että poistat sen tai että se on poistettu käytöstä, kun yrität muodostaa yhteyttä Nord VPN: ään.
Huomaa: Voit myös yrittää puhdistaa tietokoneen käynnistysohjelman. Tämä poistaa kaikki ulkopuoliset kolmannen osapuolen sovellukset käytöstä ja käynnistää vain tarvittavat. Nyt voit yrittää muodostaa yhteyden. Jos olet onnistunut, se tarkoittaa, että jokin sovellus aiheutti ongelman. Voit palata takaisin ottamalla kunkin sovelluksen käyttöön ja tarkistamalla uudelleen.
Ratkaisu 3: Palvelimen sijainnin muuttaminen
Nord VPN antaa käyttäjille mahdollisuuden valita palvelimen sijainti. Nämä palvelimet ovat hajallaan ympäri maailmaa ja tarjoavat yhteyden maantieteellisen sijaintinsa mukaan, eli lähempänäsi olevan palvelimen odotetaan olevan nopeampi. Yritämme muuttaa palvelimen sijaintia, johon yrität muodostaa yhteyden, ja selvitämme, ratkaiseeko tämä yhteyden muodostamisen ongelman.
- Käynnistä Nord VPN ja napsauta palvelimen otsikkoa sovelluksen yläosassa.

- Valitse nyt eri palvelin kuin ennen ja yritä käynnistää VPN uudelleen valitsemisen jälkeen. Jos koet saman käyttäytymisen, yritä valita toinen palvelin ja testata verkko toisella verkkosivustolla.
Ratkaisu 4: Käynnistä verkko / TAP-sovitin uudelleen
Nord VPN luo tietokoneellesi virtuaalisen verkkosovittimen, jota se voi käyttää tiedon välittämiseen. Se toimii kuin silta, jossa Nord VPN muuttaa asetuksia voidakseen aloittaa ja ylläpitää VPN-yhteyttä. Joskus tämä tapahtuu virhetilassa, joka saa sinut muodostamaan yhteyden VPN-palvelimeen. Käynnistämme sovittimen uudelleen oikein, mikä varmistaa, että kaikki sen kokoonpanot käynnistetään uudelleen.
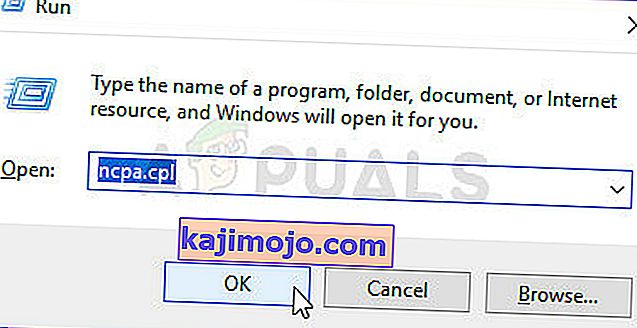
- Paina Windows + R, kirjoita “ ncpa. cpl ”valintaikkunassa ja paina Enter.
- Kaikki verkkosovittimet luetellaan edessäsi. Valitse TAP-sovitin, napsauta sitä hiiren kakkospainikkeella ja valitse Poista käytöstä .

- Odota minuutti, kun olet poistanut sen käytöstä. Napsauta sitä sitten hiiren kakkospainikkeella ja valitse Ota käyttöön . Yritä nyt yhdistää Nord VPN ja katso, onko tämä temppu.
Ratkaisu 5: Verkkopinon huuhtelu
On lukemattomia esimerkkejä siitä, kuinka tietokoneesi verkkopinon huuhtelu (päivittäminen) ratkaisee erilaiset VPN-ongelmat (myös Nord). Tämä prosessi tyhjentää DNS- ja IP-asetukset ja varmistaa, ettei sovelluksessa ole ristiriidassa virheellisiä asetuksia.
- Paina Windows + S, kirjoita valintaikkunaan komentokehote, napsauta hiiren kakkospainikkeella sovellusta ja valitse Suorita järjestelmänvalvojana .
- Kun olet korotetussa komentokehotteessa, suorita seuraavat komennot yksi kerrallaan ja sen jälkeen Enter-näppäin jokaisen komennon jälkeen:
ipconfig / vapauta ipconfig / flushdns ipconfig / uudista netsh winsock reset netsh-käyttöliittymä ipv4 reset netsh-käyttöliittymä ipv6 reset netsh winsock reset-luettelo netsh int ipv4 reset reset.log netsh int ipv6 reset reset.log

- Now close the command prompt and try launching Nord VPN again. Check if you can connect with it properly.
Solution 6: Reinstalling Nord VPN (along with the TAP adapter)
If all the above methods don’t work, you need to make sure that your Nord installation is proper and there is nothing wrong with the installation files. The TAP adapter will also be reinstalled in the process because Nord VPN manages the adapter and it is only for its use. Make sure that you are logged in as an administrator. If reinstalling doesn’t work, make sure that your credentials are correct which you are entering the services have not expired.
- Press Windows + R, type “appwiz.cpl” in the dialogue box and press Enter.
- Once in the application manager, search for the entry Nord VPN from the list, right-click on it and select Uninstall.

- Now restart your computer and download the application again from Nord VPN’s official website. Now after entering your credentials, try connecting again and check if you can establish the VPN connection correctly.
Solution 7: Using an Alternative VPN Service
There are numerous VPN clients out there in the Windows market. However, we recommend or readers to try CyberGhost. This VPN service is as simple as it gets and also provides you with servers located at different countries. It even has separate VPN servers for streaming Netflix and BBC with ease. Follow the steps below to download the application and get your connection secure in no time.
- Download CyberGhost from (here).

- After downloading the VPN, install it on your computer. You might be asked for proper permissions. Make sure that you are logged in as an administrator and press Yes to all the permissions asked.
- After CyberGhost is installed on your computer, launch it. Here you will see a list of different servers available along with the distance from your actual location (more distance means slower internet).

- After selecting the server, click on the power button present at the right-hand side of the application. You can also select dedicated servers for torrenting and streaming (present at the left navigation pane).
Solution 8: Disable Firewall
In some cases, the default Windows Firewall might be preventing the application from working properly. Therefore, in this step, we will first be allowing it through the Firewall and make sure that it isn’t blocked by the Firewall and then we will also make sure that Windows Defender has it added as an exception. For that:
- Press “Windows” + “R” to launch the Run prompt.
- Type in “ControlPanel” and press “Enter” to launch the classical control panel interface.

- Click on the “View by:” button, select “Large Icons” and then click on the Windows Defender Firewall option.
- Select the “Allow an app orfeature through the Firewall” button on the left pane and then click on the “Change Settings” button and accept the prompt.
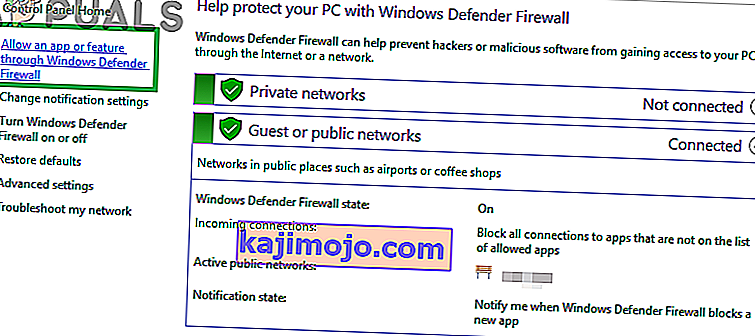
- From here, make sure that you check both the “Public” and the “Private” options for Nord VPN and its related applications/drivers.
- Save your changes and exit out of the window.
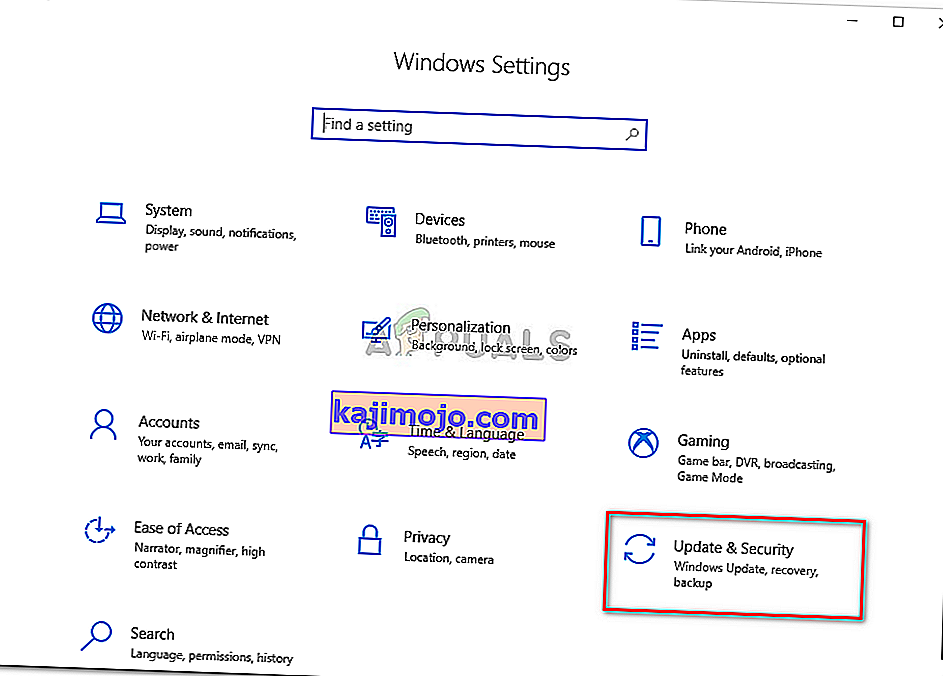
- After that, press “Windows” + “I” to launch the settings and click on the “Updateand Security” option.
- From the left pane, click on the “Windows Security” button and then click on the “Virus and Threat Protection” button.
- Select the “Manage Settings” button under the Virus and Threat Protection Settings heading.
- Scroll down and click on the “Add or Remove Exclusions” button in the next window.
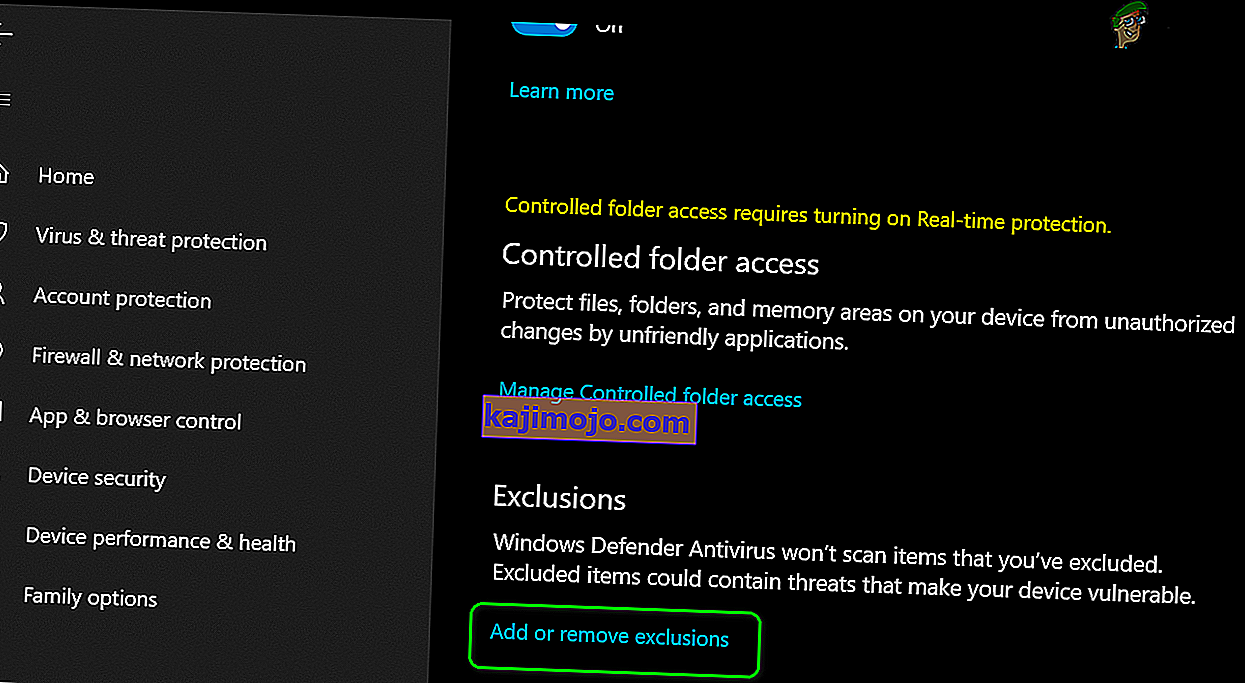
- Click on the “Add an Exclusion” option and select “Folder’ from the File type.
- Make sure to specify the Nord VPN folder and exit out of this window after saving your changes
- Check and see if doing so has fixed the issue with Nord VPN not connecting.


Solution 9: Change NordVPN Protocol
It is possible that Nord VPN might be running into issues while trying to connect to its servers due to the protocol configuration in its settings. If one type of protocol isn’t working for you, it is always recommended to try and switch to the other protocol to make sure that the issue isn’t tied to the wrong selection of the protocol type automatically or manually. For that:
- Launch NordVPN and make sure to disconnect from any currently active sessions.
- Click on the “Gear” icon on the top right corner and go into the settings.
- Click on the “Advanced” option from the left-hand side menu.
- Click on the “Protocol” dropdown and check on “TCP”.
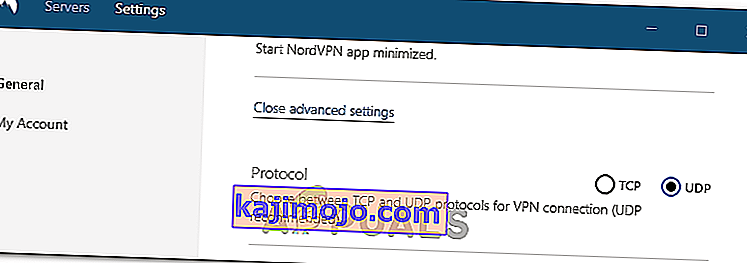
- This should change your protocol from TCP to UDP.
- Check to see if doing so fixes the issue for your computer.
- To Verify that none of the protocols work, make sure to repeat the steps and select “UDP” instead of TCP and then check again.
- If none of the selected protocols are able to make a connection with the server, move on to the other fixes.

Solution 10: Changing DNS Server Configuration
DNS Servers are used by the computer to establish a stable and secure internet connection with other sites on the internet, however, if the computer is unable to detect the DNS settings properly, or if the selected DNS server is facing outage, Nord VPN might not connect properly. Therefore, in this step, we will be changing the DNS configuration to ensure that DNS isn’t an issue. For that:
- Press “Windows” + “R” to launch the Run prompt.
- Type in “ncpa.cpl” and press “Enter” on the keyboard to launch the network configuration panel.
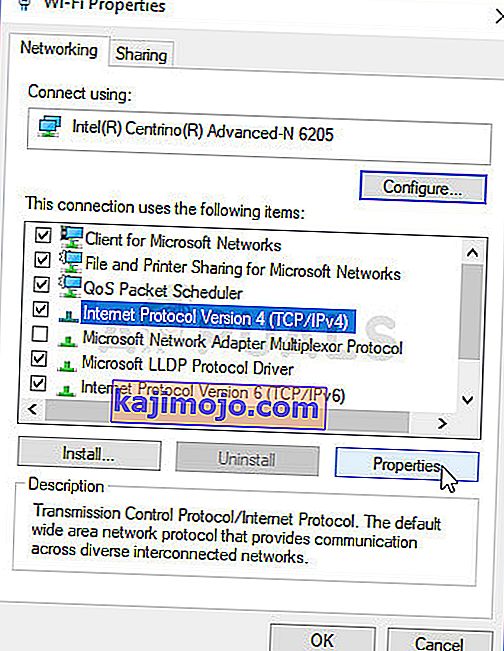
- Right-click on your internet connection and select the “Properties” option.
- Double click on the “Internet Protocol Version4 (TCP/IPV4)” option and check on the “Use the following DNS addresses” button.
- At first, type in “8.8.8.8” and “8.8.4.4” in the primary and the secondary DNS addresses field respectively and click on “OK”. After that, check to see if NordVPN is connecting, if it isn’t, try to use “103.86.96.100” and “103.86.99.100” in the primary and the secondary fields respectively.
- Check to see if you are able to make a connection by selecting those DNS servers.


Solution 11: Opening Ports
For some people, the issue might arise if the ports that NordVPN uses to communicate with its servers are being blocked by your router. For security reasons most routers often block ports used by VPN/Network Tools to prevent any alterations to your connections and if that is the case, we will have to open the ports by logging in to the router’s control panel. For that:
- Press “Windows” + “R” to launch the Run prompt and type in “cmd” and then press “Ctrl” + “Shift’ + “Enter” keys on your keyboard to provide admin permissions.

- Type in the following command in the command prompt to list the IP information.
ipconfig /all
- The computer will list all the information of the network adapters connected to your computer.
- Under the default gateway option, after the mac address, there should be an IP address that should look something like “192.168.x.x”.
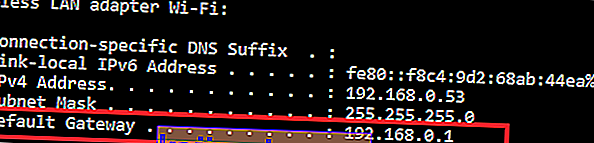
- Copy this IP address and launch your browser.
- Paste the IP address within a new tab on the browser and press “Enter” to navigate to the browser’s login page.
- Once on the login page, log into the control panel with your credentials, both of which, i.e the username and password should be written on the back of your internet router. If not, then the username should be admin and the password should be the Wifi password that you use to connect your devices.
- After logging into the Control panel, look around for a “NAT” or “Port” option that allows you to forward ports.
- Type in “500” and select “UDP” from the list.
- Click on “Save” to forward the 500 UDP port and exit out of the control panel after the change has been made.
- Try connecting with Nord VPN and check to see if the issue persists.


Solution 12: Use Hotspot
Mostly, this error can be fixed simply by employing your mobile’s hotspot connection instead of the Wifi or the Wired connection that you are already using on your computer. This does seem an inconvenience for Data conscious people but it seems to be the only way some people are able to connect through Nord VPN as some routers block it completely.
Note: In addition to this, you can try to change the firmware on your router to avoid any permanent blocks put from the router or to eliminate any bugs with the connection.