Mustan näytön ongelma Windows 10: ssä tapahtuu yleensä päivityksen jälkeen tai kun automaattinen Windows Update asentaa päivitykset järjestelmään. Koska tämä musta näyttö on todennäköisesti laitteisto (GPU) -ongelma, meidän on arvioitava ja korjattava erilaisia asetuksia diagnosoimiseksi ja korjaamiseksi.

Nykyään tietokoneet ovat yhä kehittyneempiä useilla näytönohjaimilla raskaaseen käyttöön. Joten jos sinulla on jokin muu näytönohjain kuin Intelin sisäänrakennettu grafiikkaohjain , sinulla todennäköisesti on tämä käynnistys mustalla näytöllä . Joskus Windows ottaa tämän ikään kuin järjestelmään olisi kytketty kaksi näyttöä. Joten Windows lataa lähtösignaalin mustalle näytölle.
Ennen kuin ryhdymme laajaan vianmääritykseen; meidän on tarkistettava joitain perusasetuksia. Jos käytät useita näyttöjä, katkaise yhteys / kytke se uudelleen ja testaa ensisijainen näyttö. Jos tämä ratkaisee ongelman; olet onnekas. Jos et, jatka seuraavia vaiheita:
Tapa 1: Korjaa se sokeasti
Tämä menetelmä on kyse ongelman korjaamisesta sokeasti, koska et näe mitään mustalla näytöllä.
- Kun Windows jumittuu mustaan näyttöön, odota, että valkoinen hiiren kohdistin ilmestyy näytölle. Voit tarkistaa sen läsnäolon siirtämällä hiirimattoa.
- Kun kohdistin on ilmestynyt ruudulle, paina näppäimistön välilyöntinäppäintä ja paina kerran näppäimistön ctrl- näppäintä. Anna kirjautumissalasana tai PIN-koodi sokeasti (et näe mustalla näytöllä) . Se kirjautuu Windowsiin kirjautumistiedoillasi.
Jos et näe työpöytää kirjautumisen jälkeen tiliisi ja olet jumissa mustalla näytöllä, paina näppäimistön Win + P + alanuolinäppäintä (kahdesti) ja kirjoita tiedot uudelleen.
Tapa 2: Virtakierto
Jos kyseessä on kannettava tietokone, jossa on käyttäjän irrotettava akku;
- Ota akku ulos.
- Irrota virtalähde.

- Paina virtapainiketta 10 sekuntia
- Vapauta virtapainike.
- Liitä laturi takaisin ja yritä käynnistää se.

Testaa ja katso, onko ongelma ratkaistu; jos ei, siirry tapaan 4
Tapa 3: Sammuta nopea käynnistys
Windows 10 julkaistaan Fast Startup -ominaisuudella. Kuten nimestä voi päätellä, se mahdollistaa käyttöjärjestelmän nopean käynnistämisen, jotta voit jatkaa työtäsi tai pelata nopeasti.
HUOM: Fast Start-up ominaisuus toimii vain, jos teet sammutus ja sitten Turn On järjestelmään, se ei ole voimassa, jos teet Restart .
Poista nopea käynnistysvaihtoehto käytöstä; noudata näitä vaiheitaKäynnistä Windows 10 -asennusmedialla. Saatat joutua muuttamaan käynnistysjärjestystä BIOS: sta.
katso: kuinka luoda käynnistettävä Windows 10 -tietoväline
- Valitse alareunasta Korjaa tietokone
- Napsauta Vianmääritys
- Napsauta Lisäasetukset
Huomaa: Jos tämä menetelmä ei toimi, yritä napsauttaa "Palaa edellisiin versioihin" ja seuraa näytön ohjeita.
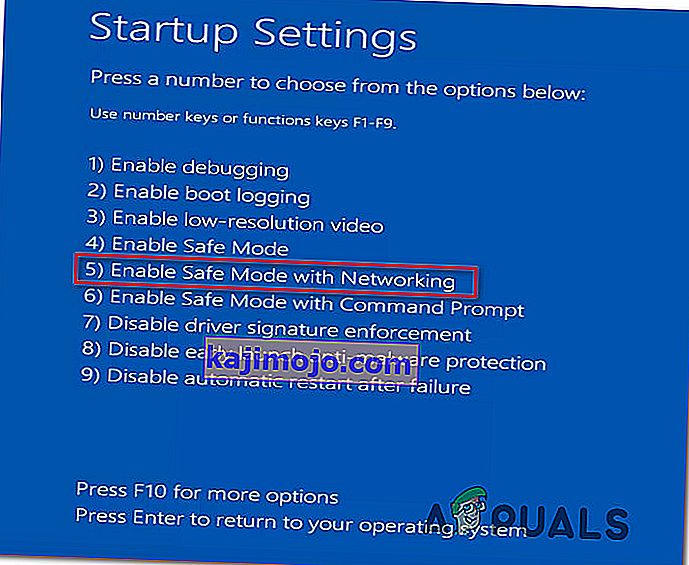
- Napsauta Käynnistysasetukset
- Napsauta Käynnistä uudelleen
- Valitse vikasietotila ja verkko
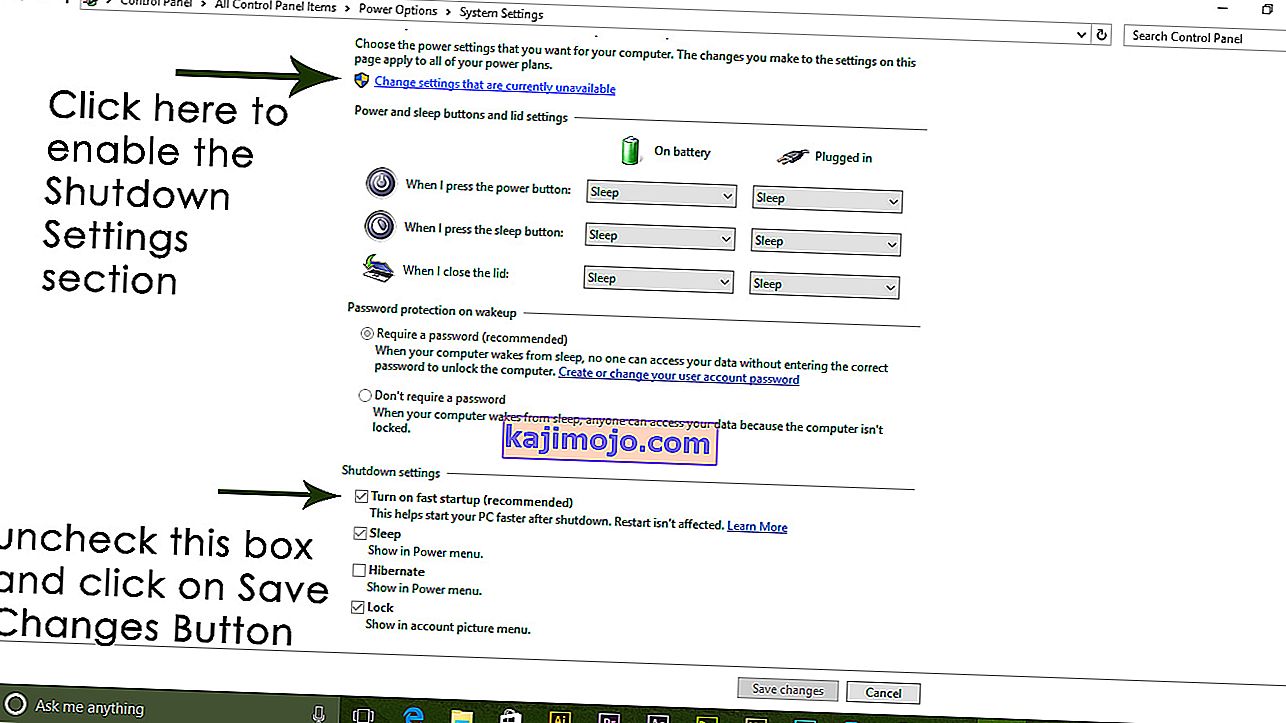
- Kun tietokone alkaa siirtyä Ohjauspaneeliin ;
- Valitse Virranhallinta-asetukset ; Valitse vasemmalla Valitse Valitse, mitä virtapainikkeet tekevät.


Täällä vieritä alaspäin ja etsi Nopea käynnistys -vaihtoehto ja poista valinta .
Tapa 4: Poista näyttösovitin
Kun näet mustan näytön:
- Pidä CTRL + ALT + DEL -näppäimiä yhdessä nähdäksesi, tuleeko Tehtävienhallinta esiin. Jos se tapahtuu, napsauta Tiedosto -> Uusi -> ja kirjoita explorer.exe
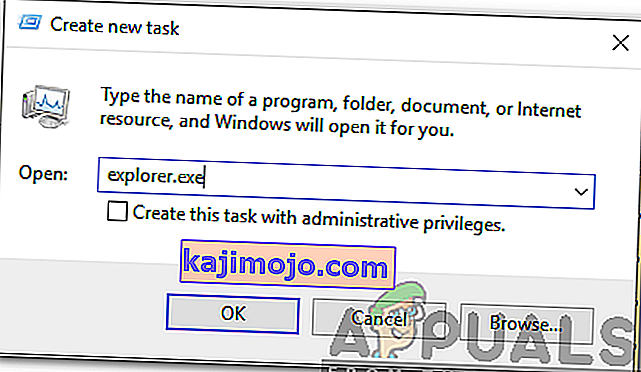
- Jos se avaa Explorer-ikkunan; kirjaudu sisään ja poista virustentorjuntaohjelmisto / grafiikkakortti ja asenna se sitten uudelleen.
Huomaa: Voit myös poistaa virustentorjunnan väliaikaisesti käytöstä sen asennuksen poistamisen sijaan.
- Näytönohjaimen asennuksen poistaminen; jos CTRL + ALT + DEL onnistuu ja näet tutkimusikkunan, pidä Win-näppäintä painettuna ja paina R-näppäintä
- Kirjoita hdwwiz.cpl ja napsauta OK
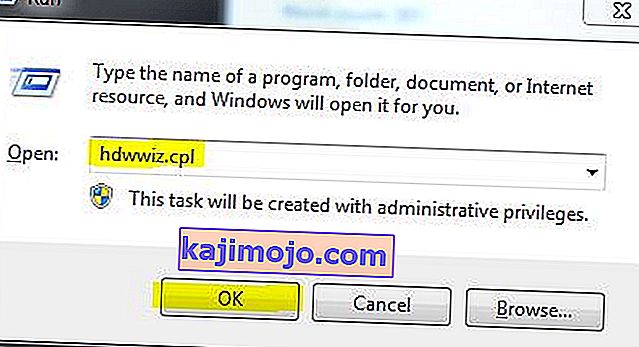
- Kirjoita muistiin näyttösi sovittimen nimi.
- Laajenna Näytön sovittimet -> Valitse Poista


Kun se on poistettu, siirry valmistajan sivustoon lataamaan uusin ohjain. Käynnistä uudelleen ja testaa
Tapa 5: Palauta järjestelmä takaisin tehdasasetuksiin
Tämä menetelmä poistaa kaikki tietosi ja laittaa / asentaa tietokoneen mukana toimitetun alkuperäisen käyttöjärjestelmän. Koska korruptio on olemassa; ja jos tiedot eivät ole tärkeitä, voimme palauttaa ne takaisin tehdasasetuksiin ja tehdä sitten Windowsin puhdas asennus. Päivitysvaihtoehtoa ei ehkä enää ole tämän jälkeen.
Katso tehdasasetusten palautusohjeet järjestelmäoppaastasi.
Tapa 6: Käynnistä tietokone uudelleen
Jotkin Windows 10 käyttäjille, jotka ovat kärsineet musta ruutu ongelma aiemmin raportissa, että yksinkertaisesti kääntää tietokoneen pois päältä sen Virta -painiketta ja sitten alkaa se takaisin ylös teki tempun ja pääsin eroon ongelma heille. Niin outoa kuin se saattaa kuulostaa, tämä ratkaisu on varmasti antoisen laukauksen arvoinen.
Tapa 7: Päivitä näytönohjaimen ohjaimet uusimpiin versioihin
Windows 10 is a big step up from the previous versions of Windows, which is why all GPU manufacturers had to create entirely new drivers designed specifically for the new Operating System. Not having the updated Windows 10-compatible drivers on your computer is another thing that can cause your computer to be affected by the black screen issue. If outdated drivers are behind the black screen problem in your case, all you need to do is go to the official website of your computer manufacturer or your GPU’s manufacturer and download the latest drivers for your GPU (they should be available in both locations). Make sure that the drivers you download are specifically designed for Windows 10 to ensure the success of this solution.
Method 8: Change your laptop’s plugged in brightness to anything but 100%
On laptops that had high-end graphics cards and were updated to Windows 8, the black screen issue often presents itself when they are plugged into an AC power outlet. If that is the case, simply opening the Start Menu, searching for Advanced power settings, opening Advanced power settings and changing your laptop’s screen brightness when plugged into anything except for 100% (even 99% will do) will get rid of the black screen problem.
Method 9: If you have two graphics cards, disable the onboard one
A decent fix for the black screen issue for people whose computers have tow graphics cards – the onboard graphics card that came with the computer and the graphics card that they have added to it (such as an Nvidia or AMD graphic card) – is to simply disable the onboard graphics card. Apparently, having two graphics cards on a Windows 10 computer can result in a clash that consequently gives birth to the black screen issue. If that is the case, simply going into Device Manager, expanding the Display adapters section, right-clicking on the onboard graphics card and clicking on Disable should fix the issue.
If you do not see your onboard graphics card in the Display adapters section, click on View in the top left of the Device Manager dialog and click on Show hidden devices. This will make your onboard graphics card (or, in some cases, cards) visible, and you can then right-click on it and click on Disable.
Method 10: Refresh your computer
The infamous black screen issue on Windows 10 can also be fixed by simply refreshing your computer. Refreshing your computer has almost entirely the same effect as resetting it to factory settings, with the exception of the fact that a refresh only deletes installed programs and applications and keeps your personal data whereas a reset gets rid of everything on your computer. To refresh a Windows 10 computer, you need to:
- Open the Start Menu.
- Click on Settings.
- Out of the array of different options provided, click on Update & Security.
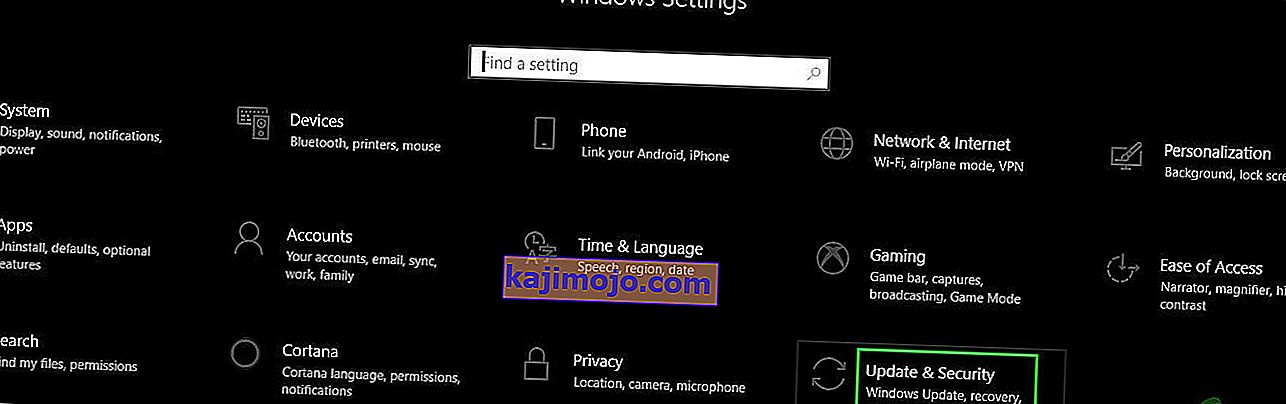
- Click on Recovery in the left pane.
- In the right pane, click on the Get started button under the Reset this PC
- When provided with a choice to either keep your files or remove everything, click on Keep my files.

Method 11: Correcting User Shell
In some cases, the User shell might be preventing the user from being able to boot safely into their computer. In certain situations, the user shell configuration inside the registry might get corrupted due to which this black screen issue can occur. Therefore, in this step, we will be correcting this user shell entry. In order to do that, follow the steps below.
- Boot your computer and wait for the black screen to appear.
- Press “Ctrl” + “Alt” + “Del” and select the “Task Manager” option.
- Click on the “File” option on the top left of the task manager and select “Run New Task” from the list.
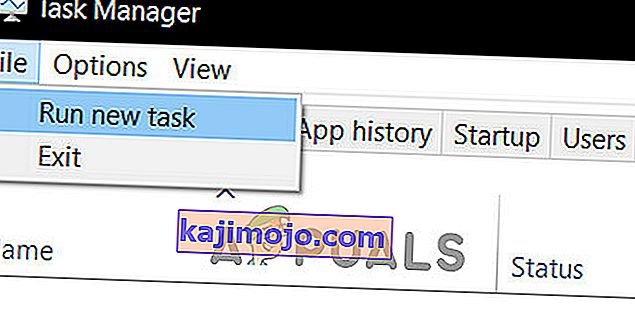
- Type in “regedit” and press “Enter” to open it.
Computer\HKEY_LOCAL_MACHINE\SOFTWARE\Microsoft\Windows NT\CurrentVersion\Winlogon
- Double click on the “Shell” entry on the right pane.
- Type in “Explorer.exe” in the Value data field and save your changes.
- Press “Ctrl” + “Alt” + “Del” again and click on the “Power Options” icon on the lower right side.

- Select “Restart” from the menu and wait for your computer to be restarted.
- Check to see if the issue persists after restarting the computer.


Method 12: Stopping Service
There is a specific service that prevents the computer from being able to function properly in some cases and stopping it can prevent the black screen issue from occurring. Therefore, in this step, we will be stopping this service. For that:
- Press “Ctrl” + “Alt” + “Del” and select the “Task Manager” option.
- Click on the “File” option on the top left of the task manager and select “Run New Task” from the list.
- Type in “services.msc” and press “Enter” to open it.
- Scroll through this list and look for the “RunOnce32.exe” or the “RunOnce.exe” entry. Also, do this same process for the “App Readiness” Service.
- Right-click on it and select “Stop”.
- Double click on it and change its startup type to “Disabled”.
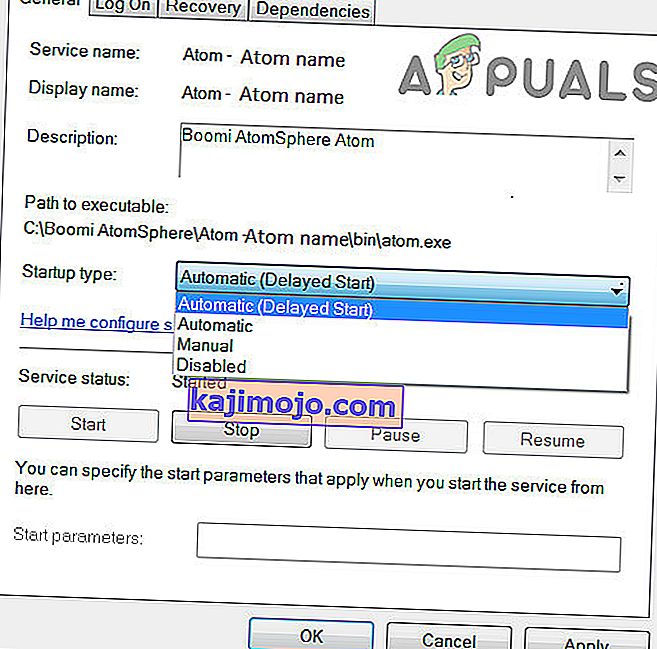
- Wait for the service to be stopped completely and restart your computer.
- Check to see if the issue persists after stopping it completely.

Method 13: Renaming Files
In certain cases, the files in some Windows’ folders might have gotten corrupted due to which this black screen issue is being triggered. Therefore, in this step, we will be renaming these files and then check to see if the issue still persists.
- Press “Ctrl” + “Alt” + “Del” on the black screen.
- Click on the “Task Manager” option and then select “File”.
- Select the “Run New Task” option and then type in “cmd”.
- Type in the following command one by one for each file to rename it.
rename “(File Path) (File Name)” “(New Name)”
- Rename the following files to anything except their original names.
C:\ProgramData\Microsoft\Windows\AppRepository\StateRepository-Deployment C:\ProgramData\Microsoft\Windows\AppRepository\StateRepository-Deployment C:\ProgramData\Microsoft\Windows\AppRepository\StateRepository-Deployment C:\ProgramData\Microsoft\Windows\AppRepository\StateRepository-Machine C:\ProgramData\Microsoft\Windows\AppRepository\StateRepository-Machine C:\ProgramData\Microsoft\Windows\AppRepository\StateRepository-Machine
- Check to see if the issue persists after making these changes.
- If it still does, try the following code to just fix it.
cd "ProgramData\Microsoft\Windows\AppRepository" ren "StateRepository-Deployment.srd" "StateRepository-Deployment-Corrupted.srd" ren "StateRepository-Deployment.srd-shm" "StateRepository-Deployment-Corrupted.srd-shm" ren "StateRepository-Deployment.srd-wal" "StateRepository-Deployment-Corrupted.srd-wal" ren "StateRepository-Machine.srd" "StateRepository-Machine-Corrupted.srd" ren "StateRepository-Machine.srd-shm" "StateRepository-Machine-Corrupted.srd-shm" ren "StateRepository-Machine.srd-wal" "StateRepository-Machine-Corrupted.srd-wal"
- Check to see if the issue persists.
Method 14: Replacing Profile Cache
It is possible the Profile cache for your current user account has either gone missing from some locations or it has been corrupted in certain locations due to which this issue is being triggered. Therefore, in this step, we will be replacing this profile cache after copying it from a location. For that:
- Create a new user account before doing so and log into that.
- Restart your computer in safe mode.
- Log in to your new profile.
- Navigate to the following location and copy the folder named “caches”.
C:\Users\{working-user-profile-name}\AppData\Local\Microsoft\Windows\Caches - Paste this folder in the following location.
C:\Users\{broken-user-profile-name}\AppData\Local\Microsoft\Windows\Caches. - Check to see if the issue persists.
Follow the onscreen instructions and dialogs, and once you are done, your computer will have been refreshed and the black screen issue will be no more.
You can further try to:
- Boot your computer in safe mode and check if the issue persists over there. This will help you to isolate these issues from a specific app that is causing it.
- Press “Windows” + “P” to switch displays that might fix this.
- Update your Bios
- Disconnect the Second monitor
- Try to use an HDMI cable for connection instead of a DVI or VGA one.
- When in the black screen, press the “Windows’ + “Ctrl” + “Shift” + “B” keys to refresh the Graphics Driver.
- You can also try to perform a Startup Repair.
- Try to create a new user account using the last methods listed in this article.
- Suorita SFC- ja DISM-skannaus.