Steam Cloud tarjoaa helpon ja läpinäkyvän tavan tallentaa pelitietosi etätallennusjärjestelmään. Auto-Cloud-määrityksessä määritetyt tiedostot tai jos ne on kirjoitettu levylle, ne kopioidaan automaattisesti Steam-pilvipalvelimille (käyttäen Cloud-sovellusliittymää) pelin olemassaolon jälkeen.

Tämä on erityisen hyödyllistä, jos käyttäjä vaihtaa tietokonettaan. Pelin etenemistä jatketaan joko Cloud-sovellusliittymän kautta tai luetaan suoraan levyltä. Tiedostot ladataan automaattisesti ennen pelin käynnistämistä, koska olisit jo kirjoittanut Steam-tunnuksesi. Steam Cloudin päätehtävänä on varmistaa, että kaikki tiedostot synkronoidaan kaikkien tietokoneiden välillä, joita käyttäjä käyttää.
Käyttäjillä on mahdollisuus poistaa käytöstä koko Cloud-synkronointi asiakkaan Steam-asetuksissa. Käyttäjillä on myös joustavuus poistaa pilvisynkronointi käytöstä peliä kohden. Mutta ennen kuin jatkat ratkaisujen kanssa, päivitä Steam-asiakas uusimpaan versioon.
Mitkä ovat erilaiset menetelmät Steam Cloudin hyödyntämisessä?
Steam tarjoaa kaksi erilaista tapaa käyttää Steam Cloudia.
Ensimmäisenä on Steam Cloud -sovellusliittymä. Cloud API tarjoaa sarjan toimintoja, joiden avulla voit integroida Steam Cloudin suoraan peliin. Pilvisovellusliittymä myös eristää yksittäiset Steam-käyttäjätiedostot toisistaan ja tarjoaa myös paremman hallinnan koko Steam Cloudiin.
Toinen on Steam Auto-Cloud. Tämä ominaisuus on suunniteltu ensisijaisesti vanhoille peleille, joissa Cloud API: n käyttö oli vaikeaa. Se on nopea tapa aloittaa Steam Cloudin käyttö, mutta siltä puuttuu Steam Cloud -sovellusliittymän tarjoama joustavuus ja teho.
Kehittäjät suosittelevat Cloud-sovellusliittymän käyttämistä Steam Auto-Cloudin sijaan, koska se tarjoaa syvemmän ja tehokkaan integraation ja mukautuksen. Sen avulla saat kaiken irti Steam-pilvestä.
Kuinka voin ratkaista Steam Cloud -ristiriidan?
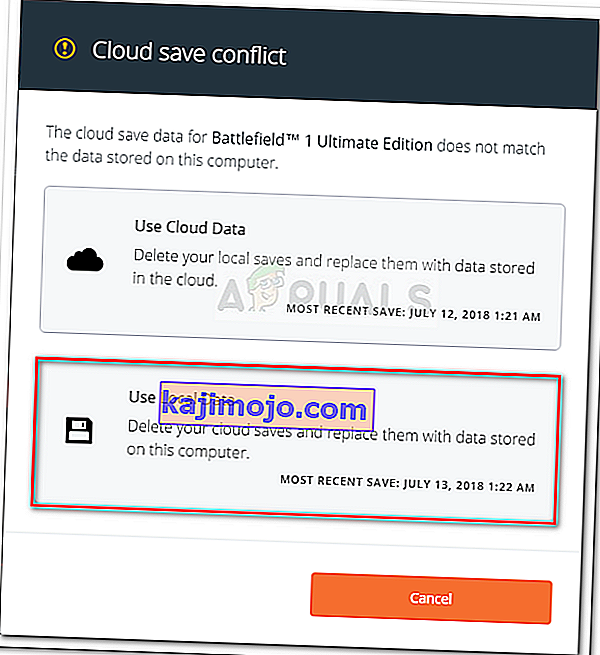
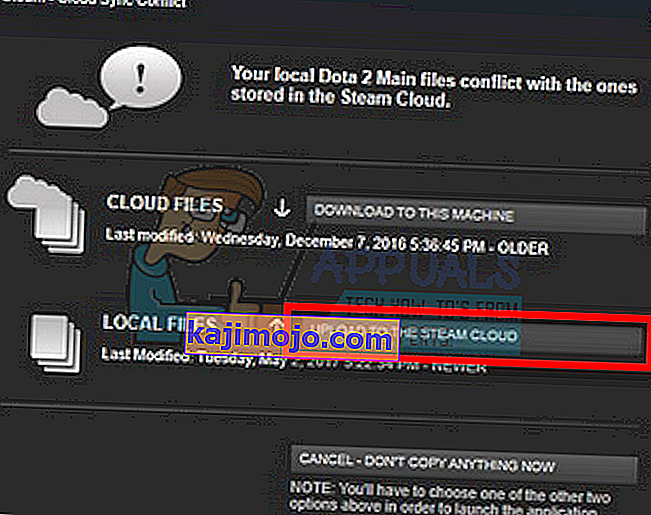
Steam Cloud -ristiriita syntyy, kun Steam Cloud -sisältö ei vastaa kiintolevylle tallennettuja paikallisia pelitiedostojasi. Tämä voi tapahtua koneessa, jota käytit tuolloin, tai se voi olla tapahtunut toisessa koneessa aiemmin. Koska tiedostoa muokattiin kahdessa eri paikassa ilman niiden välistä synkronointia, Steam ei voi määrittää, mikä tiedosto säilytetään.

Valitset todennäköisesti viimeksi muokatun tiedoston. Tämä tarkoittaa pelisi uusinta kehitystä. Tarkasta ikkunassa esikatsellut tiedot huolellisesti. Tarkista asiayhteyden päivämäärä ja aika huolellisesti ja vastaa tätä viimeiseen kertaan, kun pelasit peliä Steamissä. Tämä asiayhteys voi auttaa sinua määrittämään, mikä versio säilytetään.
Huomaa, että pelaaminen offline-tilassa estää pelisi synkronoinnin ja tämä on todennäköisin syy Steam Cloud -ristiriitaan.
Entä jos Steam ei pysty synkronoimaan tiedostoja pilveen?
Tämä virhe osoittaa, että Steam ei voinut synkronoida paikallisia tiedostoja Steam Cloudin kanssa. Se voi olla väliaikainen ongelma, jota Steam Cloud -palvelimet saattavat kohdata. Voit tarkistaa Steam Cloud -tilan Steam-verkkosivustolta varmistaaksesi, että ongelma on heidän puolellaan.

Jos Steam-pilvipalvelu on toiminnassa ja toimii täydellisesti, se tarkoittaa, että ongelma on lopussa. Voisit tarkistaa Steam-yhteyden ja vianmäärityksen. Voit myös tarkistaa, onko sinulla vain ongelmia synkronoinnissa Steam Cloudin kanssa.
Jos ohitat viestin ja napsautat "Pelaa peliä", se voi aiheuttaa mahdollisen ristiriidan paikallisten tiedostojesi ja Steam Cloudin välillä. Se voi myös johtaa menetettyyn edistymiseen ja pelitietoihin.
Entä jos menetän tiedoston tai etenen siirtyessäni toiseen tietokoneeseen?
Jos kadotat viimeisimmän edistymisesi ja olet tarkistanut, että peli käyttää Steam Cloudia Asetusten avulla, se tarkoittaa, että joko Steam ei voinut synkronoida tietojasi onnistuneesti, tai synkronointi johti siihen, että aiemmat tietosi ladattiin Pilvi.
On mahdollista, että alkuperäinen tiedosto tai edistyminen on edelleen vanhemmalla koneella eikä sitä voitu synkronoida. On mahdollista, jos käynnistät Steamin kyseisellä tietokoneella, edistymisesi näkyy. Jos näin tapahtuu, se päivitetään automaattisesti kaikissa muissa Steam-tiliisi liitetyissä koneissa.
Monet pelit eivät myöskään käytä Steam Cloud -palvelua. Voit tarkistaa pelin virallisen sivun, jos Steam Cloud -tuki on käytettävissä. Jos se ei ole ja sinulla ei ole pääsyä vanhempaan koneeseen, se tarkoittaa, että edistymisesi menetetään eikä sitä ole mahdollista palauttaa.
Kuinka poistaa Steam Cloud -palvelimiin tallennetut tiedostot?
Steam Cloudia käytetään varmuuskopioimaan jokainen pelisi edistyminen, jotta et menetä edistymistäsi, jos käytät peliä millä tahansa muulla tietokoneella. Voit varmistaa, että pilvi tallentaa edistyksen seuraavalla tavalla.
Tarkista, varmuuskopioidaanko peliäsi.
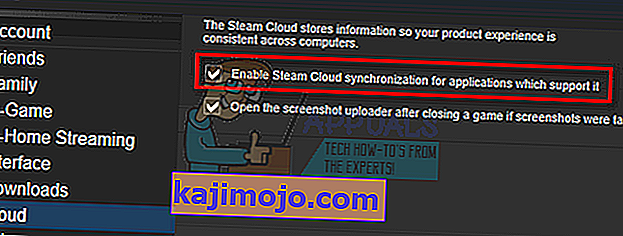
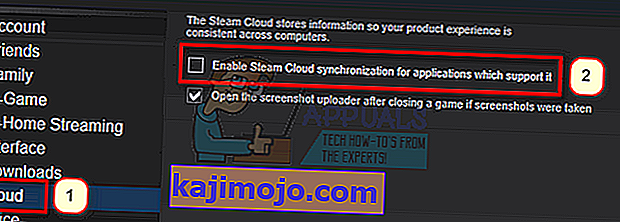
- Avaa Steam-asiakasohjelma . Avaa sen asetukset painamalla Steam-painiketta ikkunan vasemmassa yläkulmassa ja valitsemalla vaihtoehto.
- Avaa Cloud välilehti läsnä vasemmalla laidassa. Tarkista, onko vaihtoehto ” Ota Steam Cloud-synkronointi käyttöön sitä tukeville sovelluksille ”.
- Napsauta sitten Steam-asiakasohjelman yläosassa olevaa Kirjasto-välilehteä . Täällä kaikki pelisi luetellaan.
- Napsauta hiiren kakkospainikkeella peliä ja valitse Ominaisuudet . Siirry sitten ikkunan yläosassa olevaan Päivitykset- välilehteen.
- Täällä ikkunan alaosassa näet vaihtoehdon " Ota Steam Cloud-synkronointi käyttöön [pelin nimi] ". Varmista, että vaihtoehto on valittu .


Jos molemmat vaihtoehdot ovat käytössä, se tarkoittaa, että pelisi tukee Steam Cloudia, ja voimme myös poistaa tiedot.
Mikä on varmuuskopiointimekanismi?
Ensinnäkin sinun tulisi tietää, että tallennetuista pelitiedoista on kolme versiota
- Alkuperäinen versio on tallennettu AppData ( D1 ) -kansioon .
- Pilviversio tallennetaan sijaintiin Steam / userdata / SteamID / AppID ( D2 ).
- Steamin pilvipalvelimille ( D3 ) tallennettu pilviversio .
Huomaa huomautukset (D1, D2, D3), joita käytimme, koska viittaamme niihin paljon tulevaisuudessa.
Kun aloitat pelin ensimmäistä kertaa, D1 luodaan automaattisesti. Kun olet pelannut peliä, pelitiedot päivitetään D1: ssä ja kopioidaan automaattisesti D2: een. Tämän jälkeen D2 synkronoidaan D3: een, jolloin kaikki pelisisältösi ladataan.
Jos aloitat pelisi toiselta tietokoneelta ensimmäistä kertaa, jos Steamin palvelimilla on D3, mutta se ei tunnista D2: ta tietokoneessa, se lataa tiedot automaattisesti ja kopioi D3: n D2: ksi. Steam Cloud lataa myös puuttuvat tiedot automaattisesti aina, kun käynnistät Steamin.
Pähkinänkuoressa tärkein tieto meille on D2. Jos voimme manipuloida sitä, voimme poistaa tiedot, jotka haluat poistaa.
Huomaa: Joissakin peleissä ei ole D1: tä, ja ne tallentavat tietonsa suoraan D2: een. Vaikka jotkut pelit eivät käytä D2: tä mediana ja lähettävät tiedot pilveen suoraan D1: stä.
What Are the Userdata Contents?
In the directory Steam/userdata, you should have a folder corresponding to your SteamID (You check what your Steam ID is by reading our article on it). After you open it, there will folders made for each game that you play. They will be identified using their AppID (AppID can be easily checked by visiting the game in the Steam store and extracting it from the URL). In this game folder, you will find two entities.
- remotecache.vdf: This file describes all the properties of files that are contained in the remote folder.
- Remotefolder. This contains all the files which are synced with your Steam Cloud server.
Deleting Data from Cloud
In this method, we will be following two important steps. We will first bring up the Steam Cloud conflict notification and then delete the Cloud files.
Do note that you would have to follow these steps game by game to delete all of the Steam cloud content.
First, we need to delete the AppID folder from your Steam directory. After you restart your computer and Steam, Steam will automatically re-create the folder. We need to perform this step to ensure that the Steam Cloud is working perfectly and we can go ahead with the part of deletion.
- Open your Steam directory. The default location for your Steam installation is
C:\Program Files (x86)\Steam
- Search for a folder of AppID and Delete it. Then restart your computer and Steam. Start a game for a few minutes. Make sure that you have a working internet connection.
- Navigate back to the Steam directory and check if the AppID folder is back. If it is, it is confirmed that your Steam Cloud is working perfectly and we can proceed with the method.
Bringing Up Steam Cloud Conflict Dialogue
The first part of the solution is probably the most difficult. To delete all your Steam Cloud data, it is necessary to bring the conflict dialogue. Without it is not possible to delete the data present in your Cloud. Steam Cloud conflict occurs when the Cloud files differ from the data present on your hard drive.
There are two methods to bring about this conflict:
Method 1:
- Make sure that your Steam Cloud is enabled by following the steps mentioned above. Exit Steam completely by ending all the processes starting with Steamclientbootstrapper using the task manager.
- Now will alter all the files in the location
Steam\userdata\SteamID\AppID\remote
The objective is to make sure that all the files are different from those uploaded to the Steam cloud. We can’t simply delete the files from this location as Steam will automatically notice that the files are missing and download the same ones from the Cloud servers. We can achieve our task by corrupting them and making them 0-byte files.
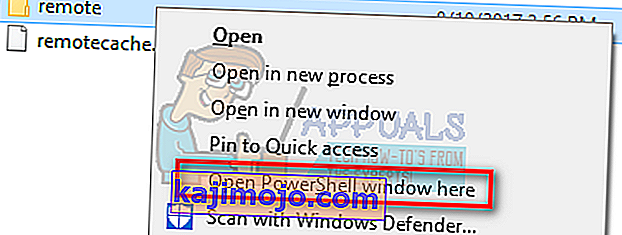
- Navigate to
Steam\userdata\SteamID\AppID\remote
- Now hold shift and right-click on your remote folder. Select the option “Open PowerShell window here”.
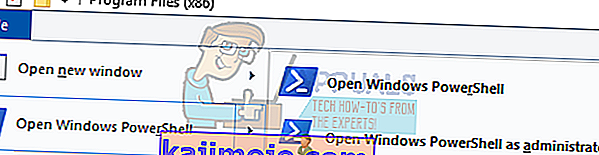
- You can also open PowerShell when in the folder by clicking the File option present at the top left side of the screen and selecting “Open Windows PowerShell as administrator”.
- Once PowerShell is opened, type the exact text written below


clc –path “C:\Program Files (x86)\Steam\userdata\SteamID\AppID\remote\*"
If you fail to write the correct code, you will get an error like this

If you correctly type in the line there will be no confirmatory message and you will get a window like this.

Start your Steam and there will be the conflict windows present on your Steam client.
Method 2:
This is an easier method as compared to the earlier one but it isn’t that efficient.
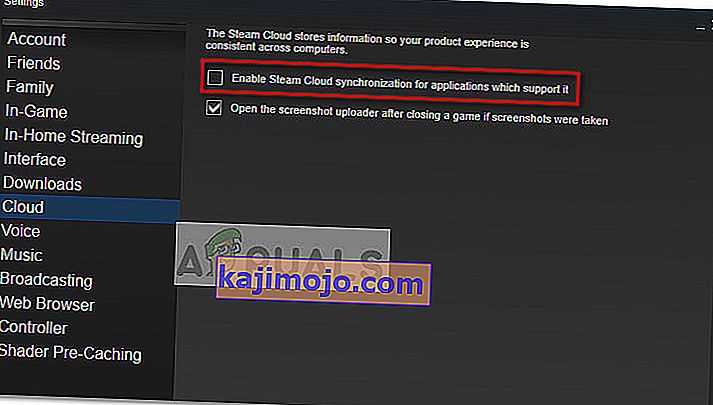
- Open your Steam client. Open its Settings by pressing the Steam button present at the top left corner of the window and selecting the option.
- Open the Cloud tab present on the left side of the screen. Uncheck the option “Enable Steam Cloud synchronization for the applications which support it”.

- Now navigate to your Stream directory as you did earlier and delete all files present in the folder of AppID. The file path for deletion is
Steam\userdata\SteamID\AppID.
- Now start the game to make new and different files in the file location.
- Exit the game and Steam completely by ending all Steam processes in the task manager (end steamclientbootstrapper first).
- Now delete the remotecache.vdf file present in the location
Steam\userdata\SteamID\AppID
- Start your Steam.
- Head over to the client’s Settings and enable the cloud.

Now a Steam conflict dialogue will come forth and we can proceed with the remaining method.
Deleting Cloud files
Once the Cloud conflict error is forth, don’t click any option and follow the instructions below.
- Navigate to the following file path
Steam\userdata\SteamID\AppID
and delete all the files in it. There will be two files (remote folder and remotecache.vdf). Delete both of them.

- Now go back to the conflict window and select the option of “Upload to the Steam Cloud”. Now Steam will sync your AppID folder while there will be nothing in it and the previous data on your Steam Cloud will be deleted.
- Now the game will start automatically but it will create new files that will be synced to your Steam cloud when you close it. We can prevent it from happening by pressing alt + tab. This will open the open windows on your screen. Select the Steam client from the list of windows.
- Once you are in the Steam client, open the client’s Settings. Navigate to the Cloud tab and uncheck the line which enables cloud.
- Now return to the game and exit. No files will be synced to your Steam cloud.
- Exit Steam and delete the AppID folder as we did before.


How to Make Sure If it Worked?
Remember how we checked at the beginning of this method if the Steam Cloud was running as expected by deleting the AppID folder and checking if it was made again. If there is no file present in the Steam cloud, there will be no file downloaded to your computer.
- Enable the Steam cloud as we did in the guide.
- Exit Steam completely by using the task manager.
- Delete the AppID folder (if you didn’t in step 2).
- Now check D3 (these are the cloud files) and compare them with D2 (local files on your computer). If there is nothing in D3, there will be nothing in D2 too!
- Check the following directory Steam\userdata\SteamID
No new AppID folder would have been created.
You can also check by logging Steam in on another computer and checking if the files exist.
If you make it till here without any problems, you have successfully deleted all the files on your Steam Cloud.
How to Delete Steam Cloud Saves from OS X
The procedures above can also be replicated on OS X and older Macs to a slight extent. By following the steps below, you will be able to delete your local saves. You can then disable the Steam Cloud synchronization from the Steam application, start a new game and create a few new saves. Then, when you return to re-enable the Steam Cloud synchronization features, the client will ask you which saves do you want to use. You can then choose the new ones which will delete and replace your old saves from the cloud.
To make things even clearer, here’s a step-by-step guide through the whole thing:
- Open your Steam application and go to Steam > Settings via the ribbon at the top of the window.
- In the settings menu, click on the Cloud tab and uncheck the box associated with Enable Steam Cloud synchronization for applications that support it.
- Close Steam completely and open your Finder app.
- Go to Library > Application Support > Steam > SteamApps > Common and open the folder of whichever game you want to delete the save files.
- Next, open the SAVE folder to reveal the saves of the game.
Note: If the location specified above doesn’t land you to the save files, try the following locations but mind the placeholders:
Users / *Your username* /Library / Application Support / *Game Folder* / Game Documents / *Game* / GameSaves Users/ *Your username* / Library / Application Support / Steam / userdata / *GameNumber* / remote Users/ *Your username* / Library / Containers / *Game Folder* / Data /Library / Application Support / *Game* / GameDocuments / *Game* / gamesaves
- Once you manage to identify and delete the local saves from the game you’re targeting, open the Game and create a few new saves.
- Exit the game, open steam and return to Steam > Settings > Cloud. From the cloud tab, re-enable the checkbox next to Enable Steam Cloud synchronization for applications which support it and click the OK button below.
- Steam will ask you whether you want to use the newly created local saves or the ones that you already have on the cloud. Choosing to use the new ones will delete the old saves that you currently have on Steam Cloud.