0xc000000e kun yritetään käynnistyä Windows tarkoittaa, että olet tekemisissä vioittunut Boot Configuration Data. Käynnistysmääritystiedot on maailmanlaajuinen tallennus kaikille uudelle Windows-tietokoneille käynnistykseen liittyville vaihtoehdoille ja asetuksille.
Saat tämän virheen, kun yrität käynnistää laitettasi, ja sinulle tulee musta näyttö, joka antaa sinulle ohjeet tietokoneen korjaamiseen asennuslevyllä tai palautusasemalla. Valitettavasti palautusaseman käyttäminen on ainoa tapa ratkaista tämä ongelma, joten sinun pitäisi saada käsiisi yksi ennen aloittamista. Jos sinulla ei ole sitä, se on melko helppo luoda Rufus- tai Windows Media Creation -työkalulla mistä tahansa muusta tietokoneesta tai kannettavasta tietokoneesta.

Sinun on myös käynnistettävä BIOSiin, jotta voit muuttaa käynnistysjärjestystä ja tehdä tietokoneestasi käynnistys palautusasemalta kiintolevyn sijaan. Voit tehdä sen seuraavasti:
- Anna BIOS- tai UEFI- asetukset painamalla emolevyn valmistajan nimeämää näppäintä ennen kuin Windows käynnistyy. Tämä avain on yleensä Esc, Delete, F2, F8, F10, F12 tai Backspace, valmistajasta riippuen. Voit tehdä online-haun BIOS-koodin avaamisesta, jota seuraa tietokoneesi malli.
- Kun olet sisällä, siirry käynnistykseen Muuta käynnistysjärjestystä BIOSin ohjeiden avulla ja aseta joko CD-ROM- tai USB-portti ensimmäiseksi laitteeksi sen mukaan, onko palautusasema CD- vai flash-asema .
- Tallenna asetukset ja poistu.

Tapa 1: Rakenna käynnistysmääritystiedot uudelleen
Tätä varten sinun on käynnistettävä tietokone palautusasemalta. Jos olet määrittänyt BIOSin yllä olevilla vaiheilla, voit tehdä sen painamalla mitä tahansa näppäintä, kun kehote tulee näyttöön. Kun tietokone on käynnistetty palautusasemasta, rakenna BCD seuraavien ohjeiden mukaan:
- Määritä Windowsin asennusikkunassa kaikki tarvittavat arvot, valitse kieli ja napsauta
- Vuonna vasemmassa alakulmassa, klikkaa Korjaa tietokone , ja halutessaan vianmääritys pois Valitse vaihtoehto näytöllä.
- Vuonna vianmääritys ikkunassa Lisäasetukset ja klikkaa Komentorivi.
- Kun komentokehote avautuu, kirjoita seuraavat komennot ja paina Enter- näppäintä kunkin jälkeen:
bootrec / scanos bootrec / fixmbr bootrec / fixboot bootrec / rebuildbcd
- Käynnistä tietokone uudelleen , ja sen pitäisi käynnistyä hienosti, ilman että se joutuisi kohtaamaan ongelmaa uudelleen.

Tapa 2: Korjaa käyttöjärjestelmäsi palautusasemalla
Tämä menetelmä korjaa myös käyttöjärjestelmän palautusaseman komentokehotteella, ja sinun pitäisi pystyä käynnistymään Windowsiin ongelmitta uudelleen. Käynnistä palautusasemalta ja noudata alla olevia ohjeita.
- Käytä edellisen menetelmän vaiheita 1–3 päästäksesi palautusaseman komentokehotteeseen .
- Kirjoita komentokehotteeseen alla olevat komennot ja suorita ne näppäimistöllä Enter . StartRep.exe apuohjelma korjaa boot arvoja ja pitäisi korjata BCD virhe. Huomaa, että joudut ehkä toistamaan tämän vaiheen useita kertoja, jos se epäonnistuu.
cd x: \ sources \ recovery StartRep.exe
- Jos edellinen Windows-korjauksen vaihe ei auttanut, kirjoita komentokehotteeseen bcdedit nähdäksesi Windows Boot Managerin arvot.
- Huomautus arvot Device . Jos niitä ei tunneta , kirjoita seuraavat komennot, joita kukin seuraa Enter- näppäimellä. Huomaa, että vaihda C: tarvittaessa osioon, johon käyttöjärjestelmäsi on asennettu.
bcdedit / set {DEFAULT.EN_US} laitealue = c: bcdedit / set {DEFAULT.EN_US} osdevice partition = c: bcdedit / set {BOOTMGR.EN_US} laiteosio = c:- Kun komentokehote on valmis, sulje se, poista palautusasema ja käynnistä järjestelmä uudelleen . Sillä ei pitäisi olla mitään ongelmia käynnistettäessä nyt.
Näiden ratkaisujen ainoa haittapuoli on, että ne edellyttävät palautumisvaivaa, kärsivällisyyttä ja voimakkaita hermoja. Jos kuitenkin noudatat niitä kuvatulla tavalla, sinun on korjattava saamasi virhe ja jatkettava laitteen käyttöä kuten aiemmin.
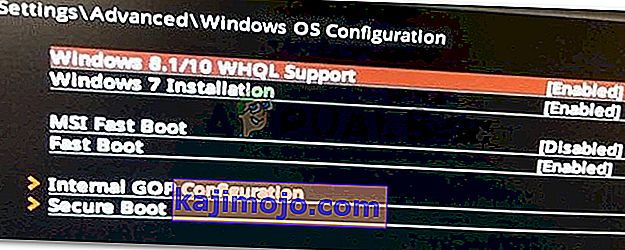
Tapa 3: Ota Windows 10 WHQL -tuki käyttöön BIOSissa
Windows 10 WHQL -tukiasetus on joissakin OEM-valmistajissa. Siinä on kaksi perustoimintoa: tarkistaa allekirjoitetut ohjaimet käynnistysprosessin aikana ja antaa sinun sallia UEFI-tuen. Jos käytät Windows 10: tä, sinun on otettava se käyttöön ja tietokoneesi voi käynnistää normaalisti. Jos sitä ei kuitenkaan ole valittu, tietokone saattaa käynnistyä virheeksi 0xc000000e. Joten voit käyttää BIOSia nähdäksesi, onko Windows 10 WHQL -tuki-asetus käytössä. Jos ei, anna sen kokeilla.
Huomaa, että Windows 10 WHQL -tukiasetusta ei tueta kaikissa tietokoneissa. Jos tietokoneellasi ei ole sitä, voit tarkistaa, onko UEFI-tuki käytössä tietokoneellasi. Jos ei, voit ottaa sen käyttöön nähdäksesi, katoako virhekoodi 0xc000000e. Sen mahdollistamiseksi:
- Sammuta tietokone kokonaan ja anna sen istua vähintään pari minuuttia.
- Kun olet varmistanut, että riittävästi aikaa on kulunut, käynnistä tietokone varmuuskopiosta ja huomaa ” Paina tätä painiketta käynnistääksesi Bios-tilan ” -vaihtoehdon.
- Käynnistä Bios-tila painamalla painiketta.
- Kun olet käynnistänyt onnistuneesti Bios-tilassa, tarkista, onko BIOSissa Windows WHQL -asetus.
- Jos se on läsnä, valitse se painamalla Enter- näppäintä korostettuasi nuolinäppäimillä. Ota se käyttöön tietokoneellasi valitsemalla Enabled- vaihtoehto.
- Tarkista , ratkaiseeko tämä ongelman.

Jos Windows 10: n käynnistysvirhe 0xc000000e näkyy edelleen sen jälkeen, kun Windows 10 WHQL -tuki-asetus tai UEFI-tuki on otettu käyttöön, sinun on ehkä nollattava tietokoneen BIOS / UEFI-kokoonpano.
Tapa 4: Rakenna BCD uudelleen Easy Recovery Essentialsin avulla
Easy Recovery Essentials on yhdellä napsautuksella automatisoitu järjestelmän korjausominaisuus, joka sisältää vikavirtasuunnan täydellisen korjauksen ja jälleenrakennuksen "0xc000000e" -virheen ratkaisemiseksi, jopa tapauksissa, joissa Windows ei käynnisty virheen seurauksena.
EasyRE: n automaattinen käynnistyskorjauskomponentti korjaa kaikki BCD: hen liittyvät ongelmat, korjaa BCD: n tai palauttaa sen alusta käyttämällä oikeaa koodausta ja polkua osioon, joka kieltäytyy lataamasta kunnolla. Se myös merkitsee levyn online-tilaksi varmistaakseen, että se toimii oikein.
Easy Recovery Essentials takaa, että ”0xc000000e” -virhe korjataan automaattisesti sisäänrakennetun automaattisen korjauksen avulla. EasyRE on tällä hetkellä saatavana Windows XP, Vista, 7, 8, 10: lle, ja sen voi ladata ja luoda millä tahansa tietokoneella.
- Hanki toinen tietokone, jota voit käyttää USB: n luomiseen, jota käytämme tietokoneen käynnistämiseen.
- Lataa Easy Recovery Essentials täältä.

- Polta kuva.
- Käynnistä tietokoneesi luomastasi Easy Recovery Essentials -CD-levyltä tai USB: ltä.
- Once EasyRE is running, choose the “Automated Repair” option and click Continue.
- After EasyRE scans your computer’s drives, identify and select the drive letter for your Windows installation from the list, and then click on the Automated Repair Option to begin.
- Easy Recovery Essentials will start analyzing the selected drive for problems. EasyRE will test for and attempt to automatically correct errors with the disk, partition, bootsector, filesystem, bootloader, and registry. No intervention is required, as EasyRE’s repair is fully automated.
- Once the process is complete, EasyRE will report its findings. Click on the Restart button to reboot your PC and test the changes.

Method 5: Reset BIOS/UEFI Configuration
Some users said that their error 0xc000000e issue is solved by resetting the BIOS/UEFI configuration. So, you can consider trying this method to see whether this issue can be solved.
Step 1. Open BIOS Menu
To reset BIOS to default settings, you need to access the BIOS menu and find the Default Settings option first.
Windows 10 users can access advanced startup options Windows 10 and get into the BIOS menu. You can click Start -> Power, press and hold the Shift key, and click Restart button to reboot Windows into Windows Recovery Environment. Then click Troubleshoot -> Advanced Options -> UEFI Firmware Settings, and click Restart to enter into the BIOS settings screen.
Alternatively, you can also restart your computer normally and press the required key in the startup screen to boot into the BIOS settings window. The hotkey is varied from different computer manufacturers, and it could be F12, Del, Esc, F8, F2, etc.
Step 2. Find the Setup Defaults Option
The name and location of the “Setup Defaults” option may be different from various computers. It generally calls like: Load Default, Load Setup Defaults, Load Default Settings, Load BIOS Defaults, Load Optimal Defaults, etc.
Use the arrow keys on the computer keyboard to find the BIOS setup default option in the BIOS settings screen. You may find it in one of the BIOS tabs.
Step 3. Reset BIOS
After you find the Load Setup Defaults option, you can select it and press the Enter button to start resetting the BIOS to factory default settings in Windows 10.
At last, you can press F10 to save and exit BIOS. Your computer will automatically reboot. If you need to change BIOS settings again in the future, you can follow the same instructions to access BIOS again to change it.
Method 6: Mark Boot Disk As Online
It is possible in some cases, that the disk that you have connected to the computer or the USB that you are trying to boot from has been marked as offline by the computer. Some computers tend to prevent extra applications, hardware, and other things from being able to run as soon as the computer starts because it allows for more convenient and fast startup experience. Therefore, in this step, we will be marking the Disk as online.
You still need to use a bootable USB medium to do this job. We will show you a step-by-step guide here:
- After booting your computer from the bootable USB drive, you need to go to Next > Repair your computer. Then, you will enter WinRE.
- Go to Troubleshoot > Advanced options > Command Prompt.
- Make sure to properly enter your login credentials if you are asked by the computer.
- Type in the following command inside the command prompt to successfully launch the disk part utility on your computer.
diskpart
- Type in either one of the following commands in the next window to list the currently connected disk drives to your computer.
List Disk List Volume
- Once the disks have been listed, you need to identify the disk that contains the Windows operating system and the one that you want to mark as active.
- After identifying it, select the disk using the following command and replacing the alphabet with the driver letter of that disk.
select disk A Select Volume A (Replace A with the Drive Letter)
- After you have successfully selected the disk, you must mark the disk as online in order to initiate the recognization process of the disk at startup. Use the following commands to do that.
Online Disk Online Volume
- Type in the following command to successfully get out of the command prompt and restart your computer after that.
Exit
- Check to see if marking the Disk as online has fixed your issue.

Method 7: Check your data cables, BIOS and drivers
Unplug all HDD data cables, and then plug them again. Revert to the previous drivers and BIOS settings if they were changed, or use “Restore factory settings” option in the BIOS. Make sure to write down all current BIOS settings that were previously selected, just in case it is required to switch back. If the error is caused by a change of the SATA disk controller’s mode in the BIOS or firmware, the fix can be as simple as entering the BIOS and toggling the SATA controller’s “mode” setting. The exact instructions differ from one manufacturer to the other, but the options will resemble what is shown in the screenshots below.
To check the boot order, follow these steps:
- Restart the computer
- Press the necessary key to open the BIOS menu. This key depends on the computer manufacturer and computer model. This is usually listed on the first screen that appears on the monitor. It can be any of the following: Esc, Del, F2, F8, F10 or F12.
- If the screen shows multiple keys, find the key to open “BIOS”, “setup” or “BIOS menu”
- Attempt to toggle between all three (or more) modes until a combination that results in Windows booting successfully once more is found.
Method 8: Boot Windows In Safe Mode
If above solutions didn’t fix the problem, then Start Windows into safe mode. This will start your PC with minimum system requirements, will not load startup programs, add-ons etc. And allow performing troubleshooting steps to fix Boot Error 0xc000000e:
Before you enter the safe mode, you need to enter the Windows Recovery Environment (winRE). To do this, you will repeatedly turn your device OFF, then ON:
- Hold down the power button for 10 seconds to turn off your device.
- Press the power button again to turn on your device.
- On the first sign that Windows has started (for example, some devices show the manufacturer’s logo when restarting) hold down the power button for 10 seconds to turn off your device.
- Press the power button again to turn on your device.
- When Windows restarts, hold down the power button for 10 seconds to turn off your device.
- Press the power button again to turn on your device.
- Allow your device to fully restart and you should boot into the Windows Recovery Environment.
Now that you are in the Windows Recovery Environment, you will follow these steps to take you to safe mode:
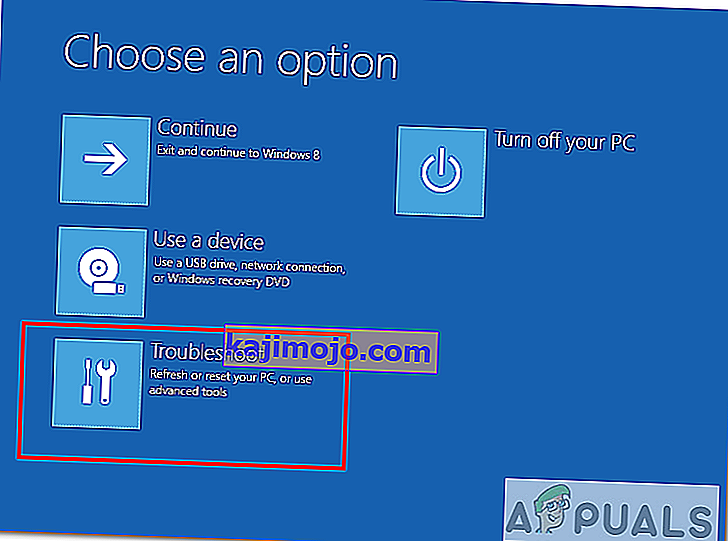
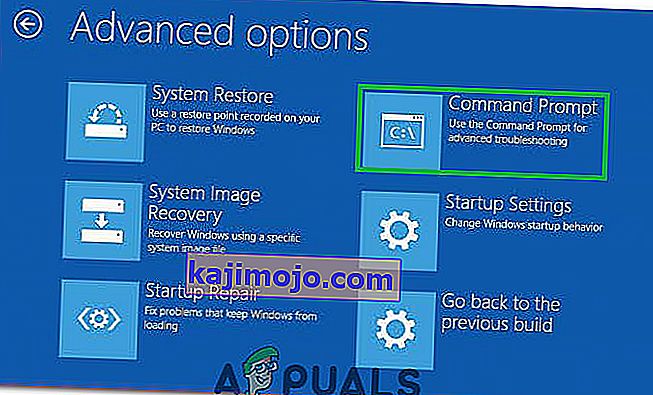
- On the Choose an option, screen, select “Troubleshoot” and then “Advanced options.”

- Now click on “Startup Settings” and click on “Restart.”
- After your device restarts, you’ll see a list of options. Select option “4” from the list or press “F4” to enter Safe Mode.

Note: If you need to exit safe mode, simply restart your device, or:
- Press the “Windows logo key + R.”
- Type “msconfig” in the Run box and then select “OK”.
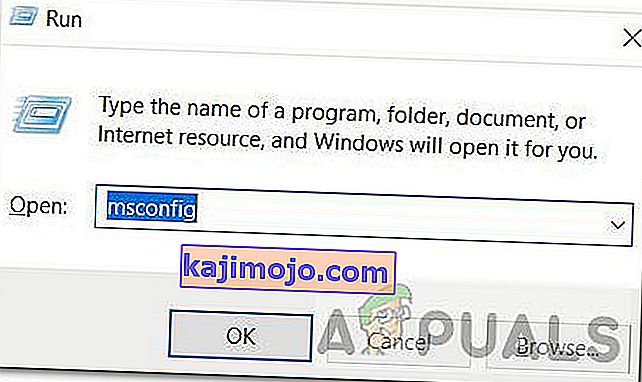
- Select the Boot tab and under Boot options, clear the Safe boot checkbox.

Method 9: Check your disk with CHKDSK utility
If the hard drive has its file integrity compromised, it is possible to use built-in Windows CHKDSK utility to scan the disk and fix the file system errors.
- Connect a USB drive that has been made bootable or insert the Windows Installation Disk on your computer.
- After connecting one of these, boot from that connected device.
- After booting your computer from the device, click on “Next” and then on the “Repair your Computer” option.
- On the next window, click on “Troubleshoot” and then on the “Advanced” Option.

- On the next screen, make sure to select the “CommandPrompt” option to successfully launch into the command prompt.
- Provide the login credentials of your account in order to boot inside the cmd.
- Inside the command prompt, type in the following command to successfully run the check disk utility on your computer.
chkdsk C: /f (Make sure to replace the "C" with the Drive letter of your partition).
- Confirm any on-screen prompts and wait for the scan to be fully completed.
- Check to see if the issue is fixed by performing this step.
Method 10: Disable fast startup Feature
If your computer has been set up to use the Fast Startup feature, you might be getting this error message on your screen because of doing so. The Fast Startup feature is known to malfunction with some operating systems and hardware combinations.
Basically, when enabled, the feature automatically sends some launch configurations to be stored in your RAM to allow for a faster startup as indicated by its name but this configuration data can sometimes be corrupted which can lead to this error on your computer. Therefore, in this step, we will be disabling it completely. For that:
- Press “Windows” + “R” to open the Run prompt.
- Type in “Control Panel” and press “enter” to launch the classical Control Panel interface.
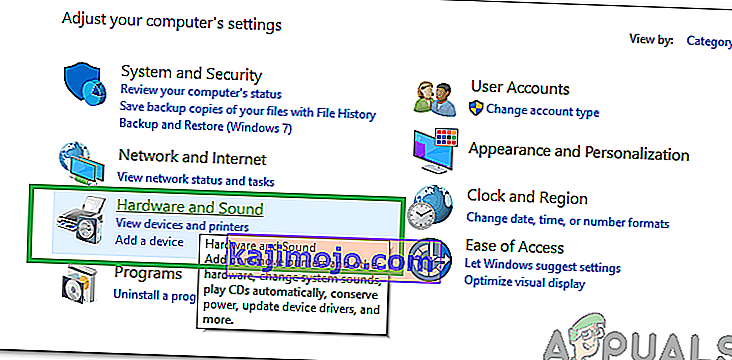
- Inside the control panel, click on the “Hardware and Sound” option and then select the “Power Options” button.
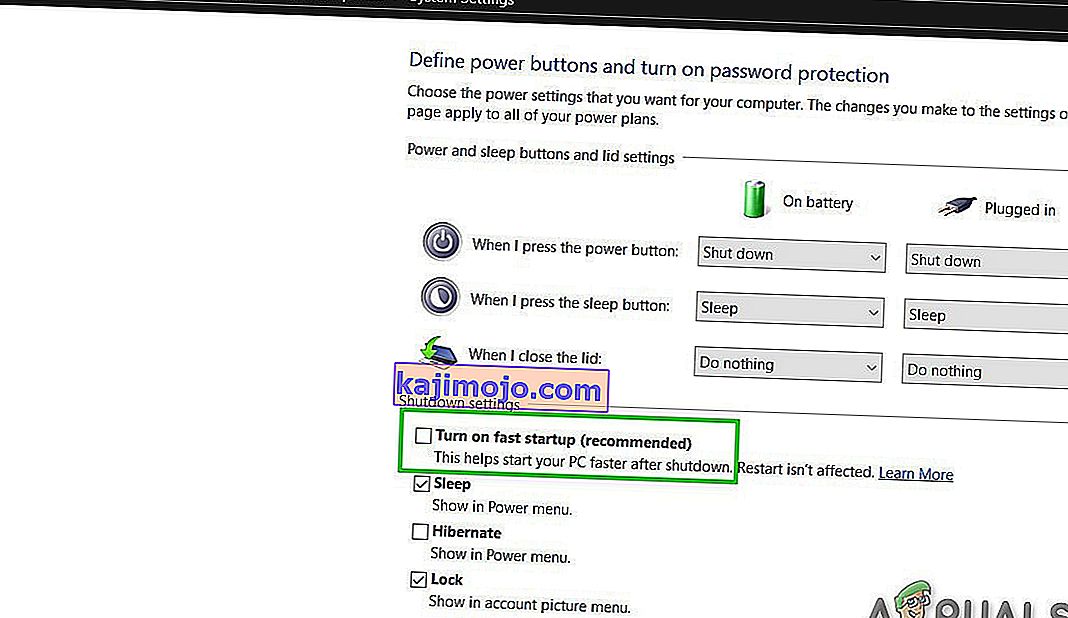
- Inside the power options, click on the “Choose what the power button does” from the left side.
- Click on the “Change Settings” option if the fast startup option is greyed out.
- Make sure to uncheck the “Turn on Fast Startup” option and save your changes.
- Closeout of the window and terminate any unnecessary applications.
- Click on the “Start Menu”, click on the “Power Options” and select “Shutdown” from the list.
- This option should completely power down your computer and after performing a complete shutdown, wait for some minutes before turning your computer back on.
- After the computer turns back on, check to see if the error message is fixed.
Note: This solution can only be applied if you are able to sometimes boot up your computer normally and are only encountering this error momentarily.


Method 11: Repair Corrupted System Files
It also possible in some situations that certain system files might have been corrupted due to a storage failure or due to some other reason. Therefore, in this step, we will be performing a complete repair of the corrupted system files and then we will check to see if doing so fixes this issue. For that:
- Press “Windows” + “R” to open the Run prompt.
- Type in “cmd” and then press “Shift” + “Ctrl” + “Enter” to launch the command prompt with admin privileges.
- Type in the following commands one by one and press “Enter” after each to successfully run an SFC scan and a DISM Scan on your computer.
DISM /Online /Cleanup-Image /RestoreHealth sfc /scannow
- Restart your computer completely once these scans are completed.
- Check to see if by performing these scans, you were able to fix this issue on your computer.

Method 12: Run Windows Startup Repair
Startup Repair is capable of diagnosing and fixing the found issues. For example, it can automatically scan system files, registry settings, configuration settings, etc. and try to fix the problem on its own. Startup Repair is especially useful when your computer is unbootable. Since your computer fails to boot, Windows can boot into WinRE automatically. While, if it doesn’t appear, you can interrupt the boot process three times in a row, and then the WinRE screen appears. Alternatively, if you have a bootable USB medium, you can also set your computer to boot from it and go to Repair your computer to enter WinRE.
After you have successfully booted into the Windows Recovery Environment, click on the “Troubleshoot” option, and from there, select the “Advanced Options” screen. Inside the advanced options, select the “StartupRepair” button to successfully initiate the Startup Repairing process. Windows will begin to diagnose your computer automatically. When the process ends, your computer will restart automatically. You can wait to see whether it can boot successfully.

Kiertotapa: Varmista, että muita laitteita ei ole kytketty, ennen kuin hyppäät komentoriville tai Käynnistyksen korjaus. On parasta kokeilla toista uudelleenkäynnistystä, kun tietokoneeseen on kytketty vähiten laitteita ja ulkoisia asemia. Tämä varmistaa, että mikään tietokoneeseen äskettäin lisätty ei aiheuta ongelmaa. Olisi parasta irrottaa kaikki uudemmat USB-asemat, CD-, DVD-levyt jne. Tämä sisältää myös muistikortinlukijan. Varmista, että kaikki ulkoiset asemat ja USB-avaimet tai USB-asemat on irrotettu, ja yritä sitten uudelleen.