" Käsittelemätön win32-poikkeus tapahtui * sovelluksen_nimi * " -virhe tapahtuu yleensä, kun käyttäjä yrittää käynnistää Visual Studiossa rakennetun sovelluksen. Useimmat tämän virheen ilmoitetut tapaukset liittyvät Uplayyn, Internet Exploreriin ja useisiin vanhempiin Windows-versioihin alun perin rakennettuihin Legacy-peleihin.

Huomaa : Näin korjaat Suorituksen kirjaston, joka liittyy Visual C ++ -sovellukseen.
Mikä aiheuttaa "Käsittelemätön poikkeus sovelluksessasi" -virheen Windowsissa?
Ongelmalle on useita yksinkertaisia syitä, ja ongelmaan voidaan puuttua tehokkaasti, jos pystyt tunnistamaan skenaariosi yksinkertaisesti oikean syyn tunnistamisen perusteella. Katso alla oleva luettelo:
- Virustentorjuntasi voi olla syyllinen - Jotkut virustentorjuntatyökalut, kuten Panda Antivirus, ovat aiheuttaneet tämän ongelman, joten muista korvata ne.
- Tietyt ohjelmat tai haittaohjelmat saattavat olla käynnissä - Jos tietokoneellasi on käynnissä asennettu ohjelma tai haittaohjelma, haluat ehkä päästä eroon siitä. Varmista, että käynnistät puhdasta käynnistystä varmistaaksesi, että se on oikea syy.
- Microsoft .NET Framework -asennus on vioittunut - Jos sen ydintiedostot ovat vioittuneet, voit joko yrittää korjata sen asennuksen, asentaa uudemman version tai suorittaa SFC-skannauksen.
- Komentosarjojen virheenkorjaus on käytössä rekisterin kautta - Kuten käy ilmi, tietty rekisteriavain voi vaikuttaa ongelman ilmenemiseen. Voit huolehtia siitä poistamalla komentosarjojen virheenkorjauksen rekisteriavaimilla.
- Msvcr92.dll: n käyttöoikeusrikkomukset - Lähdepuskurin ylittäminen tai virheellinen lopullinen tavu ovat myös tämän ongelman mahdollisia syitä. Niiden ratkaisemiseksi sinun on asennettava kaikki odottavat Windows-päivitykset.
- Ubisoft kantoraketin rekisteriavaimen poistaminen - Jos näet tämän virheen yrittäessäsi käynnistää Uplay.exe, se johtuu Ubisoft Game Launcher -sovelluksen virheestä. Tämä ongelma voidaan ratkaista myös rekisterin kautta poistamalla tähän kantorakettiin kuuluva arvo.
- Järjestelmätiedostojen vioittuminen - Järjestelmätiedostojen epäjohdonmukaisuus voi myös luoda tämän ongelman. Kevyt korruptio voidaan ratkaista yksinkertaisilla DISM- ja SFC-skannauksilla. Vakavammissa olosuhteissa puhdas asennus tai korjausasennus auttaa sinua ratkaisemaan ongelman.
Ratkaisu 1: Asenna kaikki odottavat Windows Update -päivitykset
Yksi yleisimmistä syistä, joka lopulta aiheuttaa " Käsittelemätön Win32-poikkeus tapahtui " -virheen, on sovellus, joka on rakennettu x64-alustalle MSVCR90.DLL-sovelluksen avulla ja joka lopulta kutsuu strncpy-toimintoa.
Tässä tapauksessa Msvcr92.DLL- tiedostossa käynnistetty käyttöoikeusrikkomus todennäköisesti saa sovelluksen lopettamaan vastaamisen strncpy-toiminnossa. Lähdepuskurin ylittäminen tai virheellinen lopullinen tavu ovat todennäköisimpiä syitä tähän ongelmaan.
Onneksi Microsoft on jo tietoinen tästä ongelmasta ja on julkaissut ongelman korjauksen, joka ratkaisee sen automaattisesti. Jotta voit hyödyntää sitä, sinun tarvitsee vain päivittää käyttöjärjestelmäsi versio uusimpaan käytettävissä olevaan versioon.
Huomautus: Tämä hotfix-korjaus työnnettiin Visual Studio 2008 -versiossa, jonka Windows päivittää automaattisesti, joten seuraavat vaiheet ovat yleisiä ja niiden pitäisi toimia käyttöjärjestelmäsi versiosta riippumatta.
Tässä on pikaopas Windows-version päivittämisestä uusimpaan versioon, jotta voit asentaa Visual Studio 2008: n hotfix-korjauksen ja ratkaista ongelman:
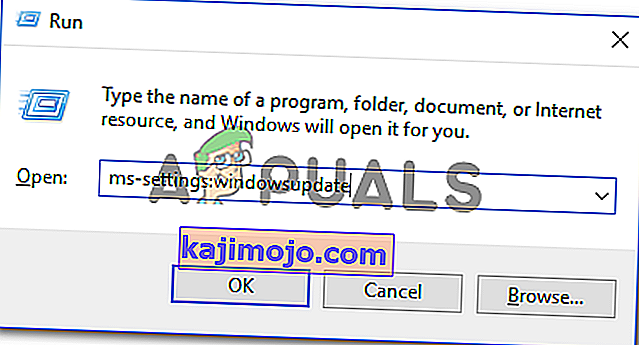
- Paina Windows-näppäin + R avata Suorita -valintaikkuna. Seuraavaksi tyyppi 'MS-asetukset: WindowsUpdate' ja paina Enter avata Windowsin päivitys välilehdellä Asetukset -sovellus.
Huomaa: Jos kohtaat tämän ongelman Windows 7: ssä tai Windows 8.1: ssä. käytä sen sijaan 'wuapp' -komentoa.
- Kun olet päässyt Windows Update -näyttöön, aloita napsauttamalla Tarkista päivitykset . Aloita sitten näyttöön tulevien kehotteiden noudattaminen viimeistelläksesi jokaisen asennusta odottavan Windows-päivityksen asennus.

Huomaa: Muista, että on tärkeää, että asennat kaikki päivitykset, ei vain kriittiset päivitykset. Koska hotfix-korjaus sisältyy Visual Studio -versioon, saatat löytää kyseisen päivityksen Valinnainen-kohdasta, joten muista asentaa ne kaikki.
- Jos sinua kehotetaan käynnistämään uudelleen ennen kuin saat mahdollisuuden asentaa kaikki saatavilla olevat päivitykset, tee se. Muista kuitenkin palata samaan näyttöön seuraavan käynnistyksen jälkeen, jotta loput päivitykset voidaan asentaa loppuun.
- Kun jokainen odottava päivitys on asennettu, käynnistä tietokone uudelleen viimeisen kerran ja toista sitten virheilmoituksen aiemmin aiheuttanut toiminto nähdäksesi, onko ongelma korjattu.


Jos kohtaat edelleen " Käsittelemätön Win32-poikkeus tapahtui " -virheen, siirry seuraavaan alla olevaan menetelmään.
Ratkaisu 2: Vaihda virustentorjuntaohjelma
Ilmaiset virustentorjuntatyökalut voivat olla varsin hyödyllisiä, ja ne voivat tehdä työnsä suojata tietokonettasi, mutta joskus he eivät vain tule toimeen muiden tietokoneen asioiden kanssa. Harkitse virustentorjunnan vaihtamista, jos se aiheuttaa tämän ongelman, kun se on päällä!
- Napsauta Käynnistä-valikkoa ja avaa Ohjauspaneeli etsimällä sitä. Vaihtoehtoisesti voit napsauttaa rataskuvaketta avataksesi asetukset, jos käytät Windows 10 -käyttöjärjestelmää.
- Valitse Ohjauspaneelista Näytä nimellä - Luokka oikeassa yläkulmassa ja napsauta Poista ohjelma Ohjelmat-osiossa.

- Jos käytät Asetukset-sovellusta, napsauttamalla Sovellukset pitäisi avata luettelo kaikista tietokoneellesi asennetuista ohjelmista.
- Etsi virustorjuntatyökalu Ohjauspaneelista tai Asetuksista ja napsauta Poista asennus .
- Ohjatun asennuksen poistotoiminnon pitäisi avautua, joten noudata ohjeita sen poistamiseksi.

- Napsauta Valmis, kun asennuksen poisto-ohjelma on valmis, ja käynnistä tietokone uudelleen nähdäksesi, näkyykö virheitä edelleen. Varmista, että valitset paremman virustentorjuntavaihtoehdon .
Ratkaisu 3: Launcher-rekisterin arvon poistaminen (jos käytettävissä)
Jos kohtaat " Käsittelemätön Win32-poikkeus tapahtui " -virheen yrittäessäsi käynnistää Uplay.exe tai muun sovelluksen, joka kuuluu Ubisoftille, se johtuu todennäköisesti heidän Ubisoft Game Launcher -sovelluksensa virheestä.
Kuten käy ilmi, tämä näyttää olevan laajalle levinnyt ongelma Windows 10: ssä, erityisesti niiden käyttäjien keskuudessa, joissa sekä Steam että Uplay on asennettu samanaikaisesti.
Useat asianomaiset käyttäjät, joiden kanssa yritämme ratkaista tätä ongelmaa, ovat onnistuneet korjaamaan ongelman löytämällä käynnistysohjelmaan kuuluvan merkkijonorekisteriarvon ja poistamalla sen rekisterieditorin avulla. Tämä oletettavasti eliminoi ristiriidan, jolloin molemmat sovellukset voivat toimia oikein saman koneen alla.
Tässä on pikaopas Uplay-käynnistysohjelmaan liittyvän rekisteriarvon poistamisesta:
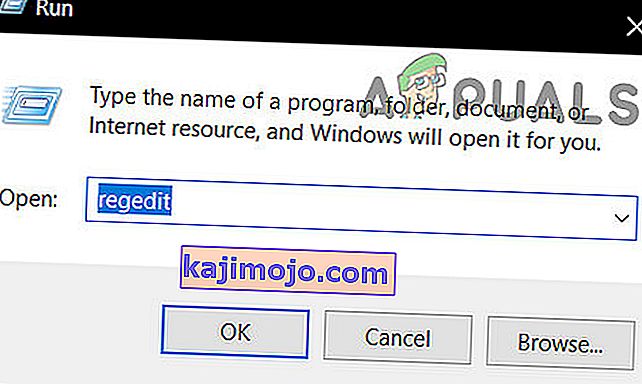
- Paina Windows-näppäin + R avata Suorita -valintaikkuna. Kirjoita tekstiruudun sisään 'regedit' ja paina Enter avataksesi rekisterieditorin . Kun UAC (User Account Control) -kehote pyytää sinua, kirjoita Kyllä myöntääksesi järjestelmänvalvojan oikeudet.
- Once you’re inside the Registry Editor, use the left-hand side section of the window to navigate to the following location:
Computer\HKEY_LOCAL_MACHINE\SOFTWARE\WOW6432Node\Ubisoft
Note: You can either navigate there manually or you can paste the location directly into the navigation bar at the top and press Enter to get there instantly.
- After you manage to land in the correct location, move down to the right-hand section of the screen, right-click on Launcher and choose to Delete to get rid of it.

Note: In case you can delete the key, here’s how to take ownership of registry keys.
Note: After you delete it, the launcher will be forced to create a new Launcher string value with fresh data, which should resolve the issue.
- Once the key has been deleted, close Registry Editor and restart your computer.
- At the next computer startup, repeat the action that was previously causing the “An unhandled win32 exception occurred‘ error and see if the problem is resolved.


In case the same issue is persisting, move down to the next potential fix below.
Solution 4: Reset Internet Explorer (if applicable)
Another potential instance with the potential of creating this issue is a series of corrupted Internet Explorer (IE). If you’re encountering the “An unhandled win32 exception occurred in iexplore.exe’ error chances are it appears after a failing script.
To fix this issue, you should reset your Internet Explorer settings via the Internet Options menu. This operation was confirmed to be successful by a lot of users that were dealing with this error.
Here’s a quick guide on resetting Internet Explorer in order to resolve the “An unhandled win32 exception occurred‘ error:
- Ensure that Internet Explorer, Edge or any other associated instance is turned off and no background process is running.
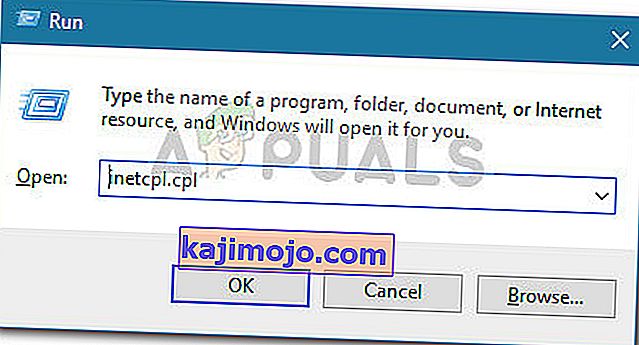
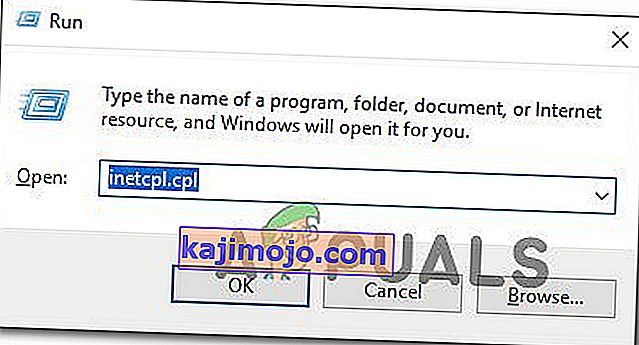
- Press Windows key + R to open up a Run dialog box. Inside the text box, type ‘inetcpl.cpl’ and press Enter to open up the Internet Options menu.
Note: If you are prompted by the UAC (User Account Control), click Yes to grant administrative privileges.
- After you manage to get inside the Internet Properties screen, select the Advanced tab from the horizontal menu at the top. Next, go to the Reset Internet Explorersettings and click on the Reset button.
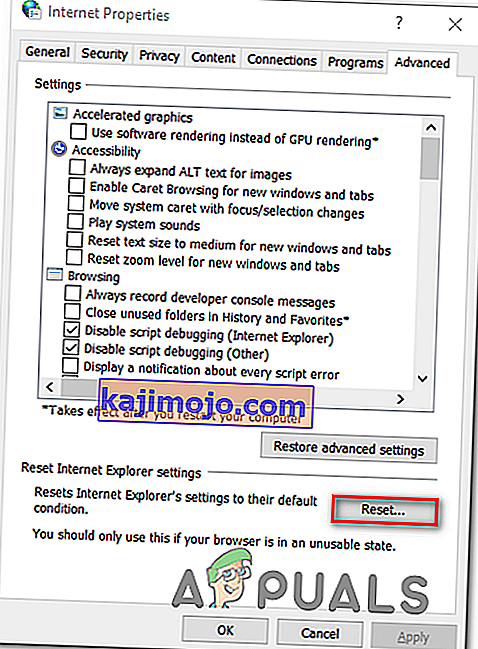
- Once you see the confirmation screen, ensure that the box associated with Delete personal settings is checked, then click on the Reset button.
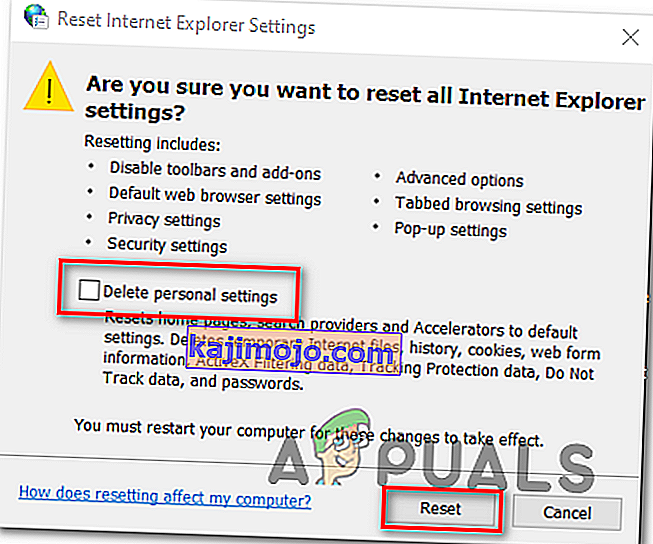
- Wait until the operation is complete, then restart your machine and see if the issue is resolved at the next computer startup.


In case the same “An unhandled win32 exception occurred in iexplore.exe’ error is still occurring, move down to the next method below.
Solution 5: Disable Script Debugging and associated Registry Keys (if applicable)
If you’re encountering the issue with Internet Explorer on a machine that has VS installed on it, the issue can also occur due when Script Debugging is enabled and the registry entries end up containing corrupted data.
Several affected users that encountered this issue have confirmed that the issue was resolved after they accessed the Internet Options menu to disable Script Debugging and then deleted the associated keys using Registry Editor.
Here’s a quick guide on doing this in order to fix the “An unhandled win32 exception occurred in iexplorer.exe’ error:
- Press Windows key + R to open up a Run dialog box. Next, inside the text box, type ‘inetcpl.cpl’ and press Enter to open up the Internet Options menu. If you are prompted by the User Account Control (UAC), click Yes to grant administrative privileges.
- Once you manage to find yourself inside the Internet Properties screen, use the menu at the top to select the Advanced tab.
- Inside the Internet Properties screen, scroll down through the Settings menu and check the box associated with Disable script debugging (Internet Explorer).
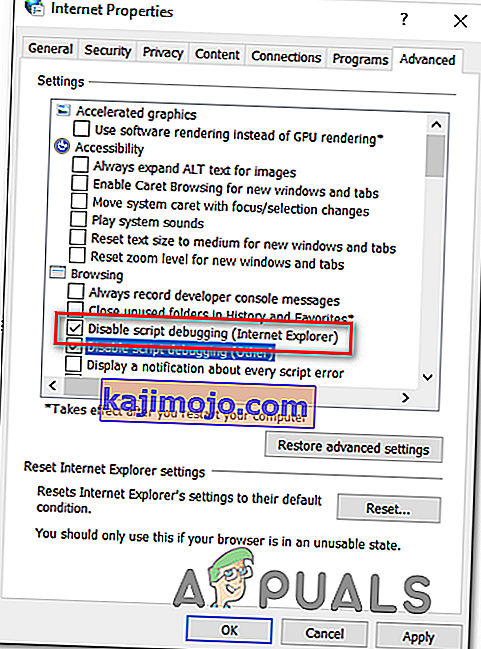
- Once the modification is enforced, hit Apply to save the changes, then close the Internet Properties window.
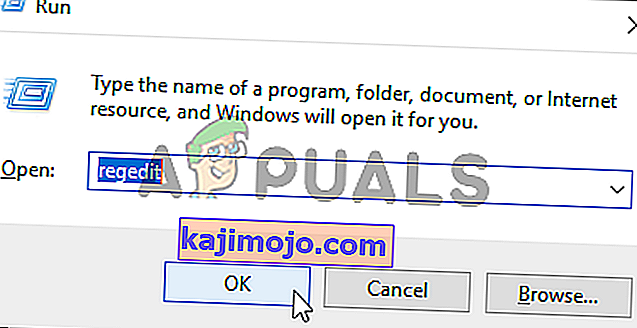
- Press Windows key + R once again to open up another dialog box. This time, type ‘regedit’ and press Enter to open up Registry Editor. You will need to grant admin access, so click Yes when prompted by the User Account Control window.
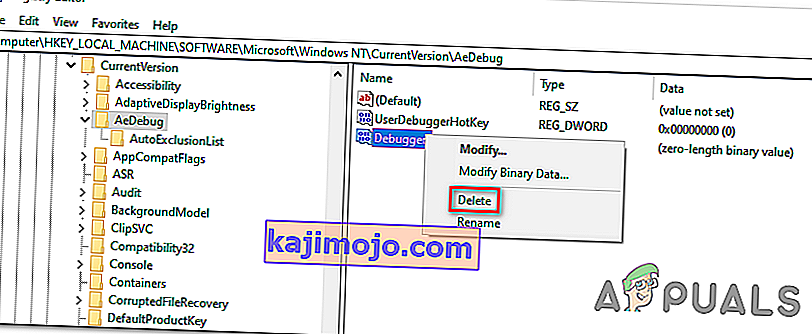
- Inside the Registry Editor, navigate to the following location using the left-hand menu:
HKEY_LOCAL_MACHINE\SOFTWARE\Microsoft\Windows NT\CurrentVersion\AeDebug (32 - Bit Machine) HKEY_LOCAL_MACHINE\SOFTWARE\Wow6432Node\Microsoft\Windows NT\CurrentVersion\AeDebug (64 - Bit Machine)
Note: The location of the file we need to delete is different depending on the Windows version that you’re using. If you have a 32 – bit Windows version use the first location, else, use the second.
- Once you arrive to the correct location, move down to the right-section, right-click on Debugger and choose Delete from the context menu.
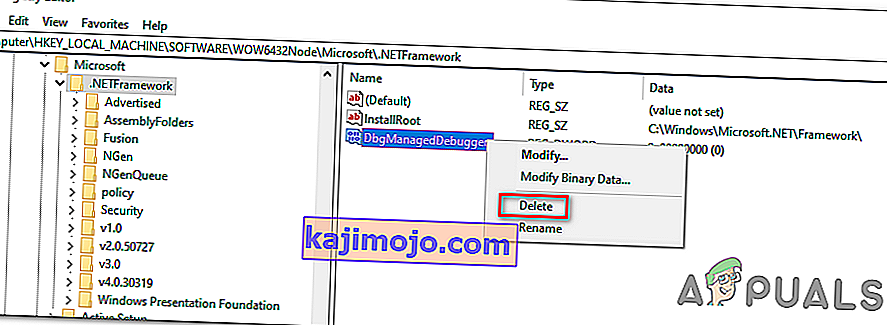
- Once this key is deleted, navigate to this second location:
HKEY_LOCAL_MACHINE\SOFTWARE\Microsoft\.NETFramework\ (32 - Bit Machine) HKEY_LOCAL_MACHINE\SOFTWARE\Wow6432Node\Microsoft\.NETFramework (64 - Bit Machine)
Note: Access the registry key associated with your Windows bit version that you’re using.
- When you arrive at the correct location, move over to the right-hand section and delete the DbgManagedDebugger value by right-clicking on it and choosing Delete from the context menu.
- After you manage to delete the value, close the Registry Editor and restart your computer.
- Once the next startup is complete, see if the same issue is still occurring.


In case the “An unhandled win32 exception occurred’ error is still occurring, move down to the next method below.
Solution 6: Install the Latest Version of NET Framework and Repair it
Having NET Framework installed on your computer is vital and plenty of modern games and programs depend on you having it installed. Before repairing it, follow the steps below in order to install the latest version on your computer.
Navigate to this link and click the red download button in order to download the latest version of the Microsoft .NET Framework. After the download has finished, locate the file you downloaded and run it. Note that you will need to have constant access to the Internet. Follow the instructions on-screen to proceed with the installation.
- After installing the latest version, it’s time to check its integrity. On your keyboard, use the Windows Key + R key combination to open the Run dialog box.
- Type in control.exe and click OK in order to open it.

- Click the Uninstall a Program option and click Turn Windows features on or off. Make sure you locate the .NET Framework 4.x.x entry and make sure it’s enabled. ‘x.x’ marks the latest version available for your operating system.
- If the checkbox next to .NET Framework 4.x.x is not enabled, enable it by clicking the box. Click OK to close the Windows Feature window and reboot the computer.

- If .Net Framework 4.x.x is already enabled, you can repair .Net Framework by clearing the box and rebooting the computer. After the computer has restarted, re-enable .Net Framework and restart the computer again.
Solution 7: Perform a Clean Boot
There are various other programs and services which can affect the proper functionality of the Microsoft .NET Framework suite. In most cases, the cause is the antivirus you have installed and you can try disabling it to see if the error persists. However, to make sure nothing can interfere with the installation, we recommend you perform a clean boot which will disable all non-Microsoft programs and services from starting up. This way, you can easily deduct just which program causes this error to happen!
- Use the Windows + R key combination on your keyboard. In the Run dialog box type MSCONFIG and click OK.
- Click on the Boot tab and uncheck the Safe Boot option (if checked).

- Under the General tab in the same window, click to select the Selective startup option, and then click to clear the Load startup items check box to make sure it’s not checked.
- Under the Services tab, click to select the Hide all Microsoft services check box, and then click Disable all.

- On the Startup tab, click Open Task Manager. In the Task Manager window under the Startup tab, right click on each startup item which is enabled and select Disable.

- After this, you will need to perform some of the most boring processes and that is enabling the Startup items one by one and restarting your computer. After that, you need to check whether the problem appears again. You will need to repeat the same process even for the Services which you have disabled in Step 4.
- Once you locate the problematic startup item or service, you can undertake action in order to solve the problem. If it is a program, you can reinstall it or repair If it is a service, you can disable it, etc.
Solution 8: Use SFC to Scan for Memory Leaks
It has been reported that the Microsoft .NET Framework corruption is related to faulty system files. These problems are rooted deep inside the system files and the only way to try to resolve them is by running the System File Checker (SFC). It will scan your system files for errors and possible repair or replace them. Follow the steps below in order to do so!
- Search for “Command Prompt” by typing it either right in the Start menu or by pressing the search button right next to it. Right-click the first entry which will pop up as a search result and select the “Run as administrator” context menu entry.
- Additionally, you can also use the Windows Logo Key + R key combination in order to bring up the Run dialog box. Type in “cmd” in the dialog box which appears and use the Ctrl + Shift + Enter key combination for admin Command Prompt.

- Type in the following commands in the window and make sure you press Enter after typing each one. Wait for the “Operation completed successfully” message or something similar to know that the method worked.
sfc /scannow
- Try to restart your computer and check to see if the Unhandled Exception has Occurred in your Application error continues to appear on your computer.
Solution 9: Performing a Clean Install
If none of the methods presented below have managed to help you in resolving the issue, it’s very likely that you’re dealing with some kind of Windows inconsistency that cannot be resolved conventionally.
If this scenario is applicable, you should be able to fix the issue by resetting every component associated with your Windows installation. If you want to go this route, you have two ways forward. It all boils down to the procedure that you want to follow:
- Repair install (in-place repair) – This procedure is the best approach when you need to refresh every OS component, but some users might end up considering it a little too tedious for their taste. Keep in mind that you will need a compatible installation media in order to enforce this fix, but the major advantage is that all your personal data (including games, applications and personal media) will be preserved even if you don’t back up your computer.
- Clean install – If you’re looking for the simplest solution, this is the way to go. You will not need an installation media to enforce it (it’s all done through the Windows GUI). But unless you back up your data in advance, be prepared for total data loss.