Jotkut Windows-käyttäjät, jotka äskettäin päivittivät Windows 10: ksi, ovat valittaneet tehtäväpalkista, joka jäätyy kokonaan useita kertoja. Kun näin tapahtuu, käyttäjät eivät voi napsauttaa mitään tehtäväpalkin elementtiä, eli Käynnistä-valikkoa, kuvakkeita, ilmoituksia. Pikanäppäimet, kuten Windows + R ja Windows + X, eivät myöskään toimi.
Tämä ongelma ei ole perussyy, koska se on hyvin yleinen Windowsissa. Jotkut ovat kuitenkin linkittäneet sen Dropboxiin ja muutamaan viallisesti toimivaan sovellukseen. Tässä artikkelissa tutkitaan erilaisia vaihtoehtoja, joilla voimme ratkaista tämän ongelman. Tähän sisältyy muun muassa SFC-tarkistuksen suorittaminen, tiettyjen sovellusten poistaminen, Explorerin käynnistäminen.
Tapa 1: Käynnistä Windows Explorer uudelleen
- Käynnistä Windows Tehtävienhallinta painamalla Ctrl + Vaihto + Esc- näppäimiä.
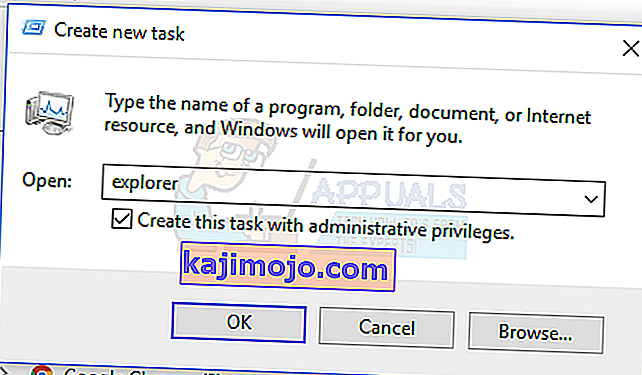
- Napsauta Tehtävienhallinnassa Tiedosto > Suorita uusi tehtävä . Kirjoita explorer avoimeen ruutuun, valitse sitten Luo tämä tehtävä järjestelmänvalvojan oikeuksilla -valintaruutu ja napsauta OK .

Vaihtoehtoisesti voit:
- Käynnistä Windows Tehtävienhallinta painamalla Ctrl + Vaihto + Esc- näppäimiä.
- Hae Resurssienhallintaa Prosessit-välilehdeltä
- Napsauta hiiren kakkospainikkeella Explorer-merkintää ja valitse Käynnistä uudelleen .
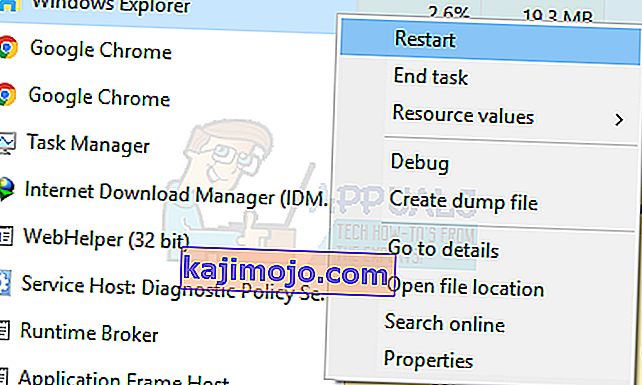
- Explorer käynnistyy uudelleen ja tehtäväpalkin pitäisi alkaa toimia uudelleen

Tapa 2: Suorita SFC-skannaus
- Käynnistä Windows Tehtävienhallinta painamalla Ctrl + Vaihto + Esc- näppäimiä.
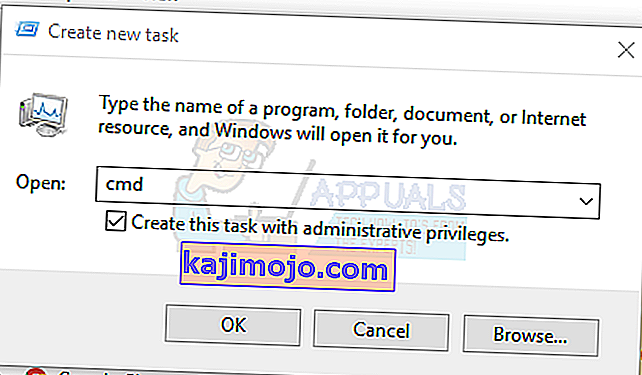
- Napsauta Tehtävienhallinnassa Käynnistä> Suorita uusi tehtävä . Kirjoita cmd avoimeen ruutuun ja valitse sitten Luo tämä tehtävä järjestelmänvalvojan oikeuksilla -valintaruutu ja napsauta OK .
- Kirjoita komentokehotteeseen seuraavat komennot ja paina Enter jokaisen komennon jälkeen:
sfc / scannow dism / Online / Cleanup-image / Restorehealth
Tämä suorittaa järjestelmätiedostotarkistuksen ja korjaa kaikki tietokoneesi vioittuneet järjestelmätiedostot.
- Käynnistä tietokone uudelleen ja tarkista, onko jumittunut tehtäväpalkki loppunut.

Tapa 3: Powershell Fix
Käytä tätä Powershell-komentoa pakastetun tehtäväpalkin pakastamiseen näiden vaiheiden avulla.
- Ctrl + Vaihto + Esc- näppäimet käynnistääksesi Windowsin Tehtävienhallinnan.
- Napsauta Lisätietoja , valitse Palvelut- välilehti ja varmista, että MpsSvc (Windowsin palomuuri) on käynnissä.
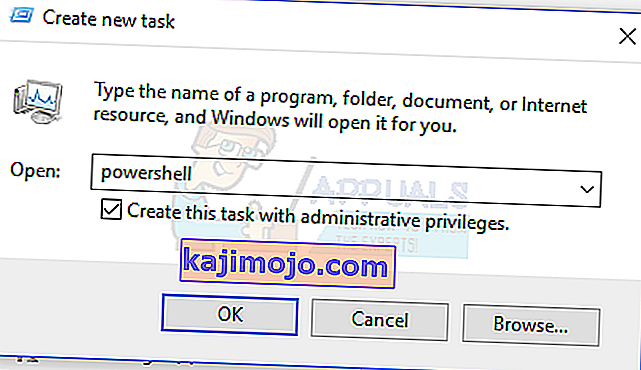
- Avaa Suorita-kehote painamalla Windows + R- näppäintä. Kirjoita kehotteeseen powershell ja paina Enter.
Jos Suorituskehote ei avaudu, käynnistä Windows Tehtävienhallinta painamalla Ctrl + Vaihto + Esc -näppäimiä, napsauta Käynnistä> Suorita uusi tehtävä . Kirjoita powershell avoimeen ruutuun, valitse sitten Luo tämä tehtävä järjestelmänvalvojan oikeuksilla -valintaruutu ja napsauta OK .
- Liitä Powershell-ikkunaan seuraava komento ja paina Enter:
Get-AppXPackage -AllUsers | Foreach {Add-AppxPackage -DisableDevelopmentMode -Rekisteröi "$ ($ _. InstallLocation) \ AppXManifest.xml"}. - Tehtäväpalkin pitäisi olla täysin toimiva tämän jälkeen.

Tapa 4: Ota User Manager käyttöön
Poistettu User Manager voi johtaa jumittuneeseen Windows 10: n tehtäväpalkkiin. Yritä ottaa User Manager uudelleen käyttöön näillä vaiheilla.
- Paina Windows-näppäintä + R , kirjoita services.msc ja napsauta OK . Tämä avaa palvelukonsolin.
- Etsi User Manager ja kaksoisnapsauta sitä.
- Aseta Käynnistystyyppi-asetukseksi Automaattinen ja Käynnistä palvelu, jos se on pysäytetty. Napsauta OK .

- Käynnistä tietokone uudelleen ja tehtäväpalkin pitäisi toimia täydellisesti tällä hetkellä.

Tapa 5: Poista sovellukset
Jotkut käyttäjät ovat tunnistaneet tietyt sovellukset, jotka aiheuttivat tehtäväpalkin toiminnan. Nämä sovellukset ovat Dropbox ja Classic Shell . Jos epäilet, että jotkut sovellukset aiheuttavat tämän, voit myös poistaa sen.
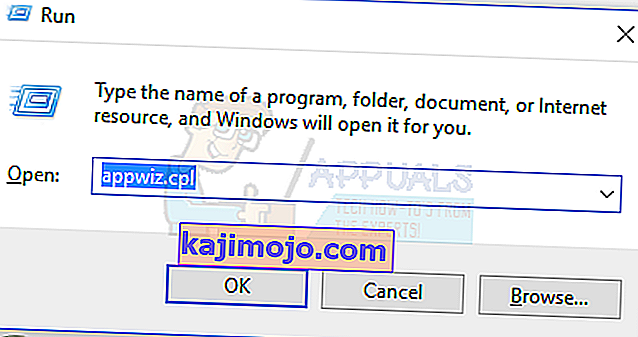
- Paina Windows + R- näppäimiä avataksesi ajokehotteen. Kirjoita appwiz. cpl ja paina Enter .
- Etsi sovellus asennettujen sovellusten luettelosta ja kaksoisnapsauta sitä. Noudata nyt ohjeita asennuksen loppuun saattamiseksi.
- Käynnistä tietokone uudelleen ja tarkista sitten, toimiiko tehtäväpalkki nyt oikein.

Tapa 6: Äskettäin avattujen kohteiden poistaminen käytöstä
Äskettäin avatut kohteet voivat hidastaa luettelon käynnistämistä. Niiden poistaminen käytöstä tekee siitä nopeamman ja estää jäätymisen. Poista äskettäin avatut kohteet käytöstä näiden ohjeiden mukaan.
- Avaa Asetukset-sovellus painamalla Win + I.
- Siirry kohtaan Mukauttaminen> Käynnistä
- Sammuta se liu'uttamalla Näytä äskettäin avatut kohteet Käynnistä-luettelossa tai tehtäväpalkissa olevaa äskettäin avattua kohdetta .

- Tehtäväpalkki ei saa jäätyä käynnistettäessä seuraavalla uudelleenkäynnistyksellä

Tapa 7: Nollaa Windows 10 -palvelut
Jos mikään yllä olevista menetelmistä ei ole tässä vaiheessa toiminut, yritä suorittaa tämä komentosarja järjestelmänvalvojana napsauttamalla sitä hiiren kakkospainikkeella ja valitsemalla Suorita järjestelmänvalvojana . Jos WiFi ei jostain syystä enää toimi, korjaa WiFi-ongelma noudattamalla tässä olevia ohjeita (menetelmä 3 - vaihe 2: vaihtoehto 2).
Tapa 8: Luo uusi käyttäjätili
Joissakin tilanteissa virhe saattaa laukaista, jos käyttäjätilisi asetuksia tai määrityksiä ei ole määritetty oikein ja jos näissä määritystiedoissa on vioittuneita. Siksi voit vaihtoehtoisesti yrittää luoda uuden käyttäjätilin Windows 10 -laitteellesi ja tuoda sitten tiedot vanhemmalta tililtä myöhemmin, jos se korjaa ongelman. Tehdäkseen niin:
- Avaa asetukset painamalla "Windows" + "I" ja napsauta "Tilit" -vaihtoehtoa.
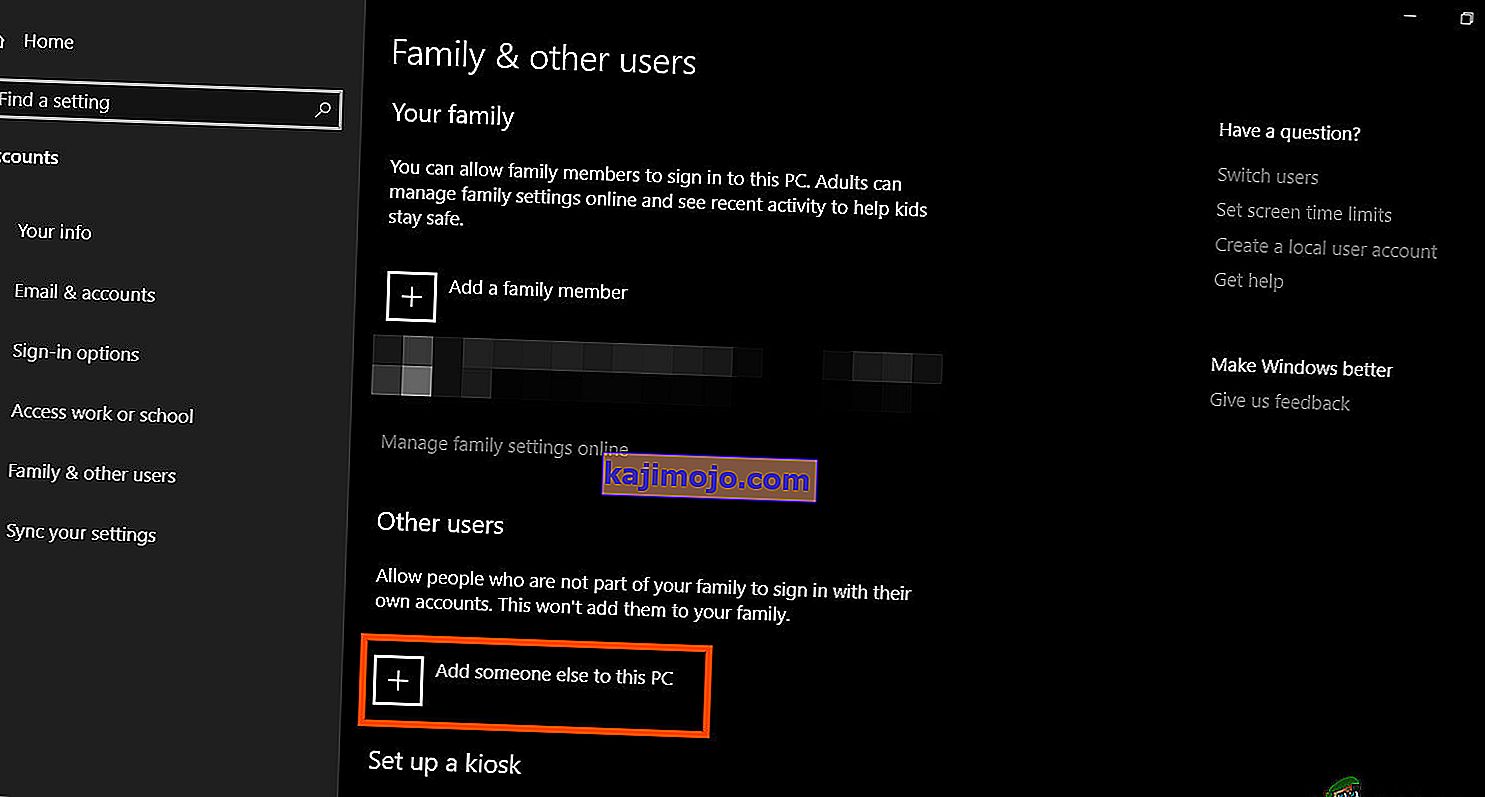
- Napsauta tilit-vaihtoehdossa vasemmalla puolella olevaa Perhe ja muut käyttäjät -painiketta.
- Valitse valikosta Lisää joku muu tähän tietokoneeseen -vaihtoehto.
- Napsauta " Minulla ei ole tämän henkilön kirjautumistietoja " -painiketta seuraavassa ikkunassa.
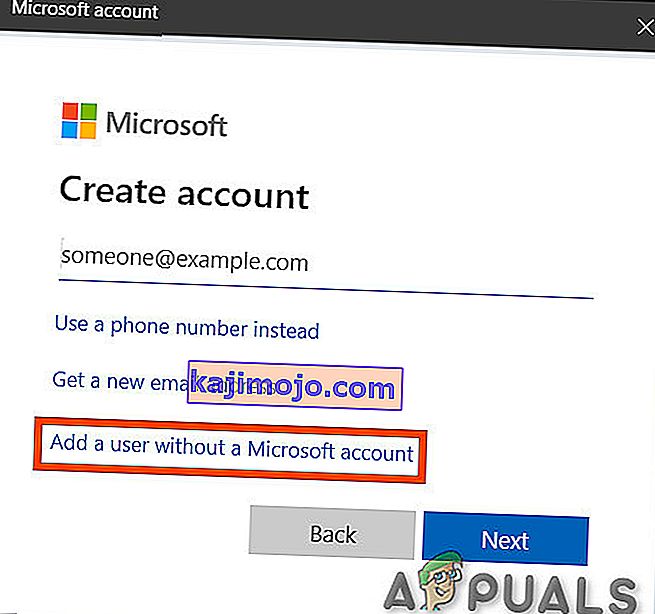
- Napsauta "Lisää käyttäjä ilman Microsoft-tiliä" -vaihtoehtoa uudesta ponnahdusikkunasta.
- Syötä käyttäjätilin käyttäjätunnus ja anna sille salasana.
- Kirjoita turvakysymykset, vastaa niihin ja napsauta sitten Seuraava- vaihtoehtoa.
- Kun olet luonut tämän tilin, napsauta sitä ja valitse sitten Vaihda tilin tyyppi -vaihtoehto.
- Napsauta avattavaa "Tilityyppi" -valikkoa ja valitse sitten "Järjestelmänvalvoja" -vaihtoehto.
- Tallenna muutokset ja kirjaudu tälle tilille.
- Kun olet kirjautunut tilille, suorita Steam ja tarkista onko peli käynnissä.


Jos näin korjaat ongelman tietokoneellasi, muista tuoda käyttäjätilitiedot edelliseltä tililtä uudelle tilille ja jatkaa niiden normaalia käyttöä.
Tapa 9: Diagnoosi vikasietotilassa
Joskus olet saattanut asentaa tietokoneellesi joitain kolmannen osapuolen sovelluksia, jotka saattavat estää sinua suorittamasta tehtäväpalkkia tai siihen liittyviä palveluja oikein. Tämän lisäksi on mahdollista, että jopa Windowsin tai Microsoftin palvelu estää tietokoneen moitteetonta toimintaa. Siksi tässä vaiheessa diagnosoimme tämän ongelman vikasietotilassa ja sitten tarkistamme, voidaanko se korjata. Sen vuoksi:
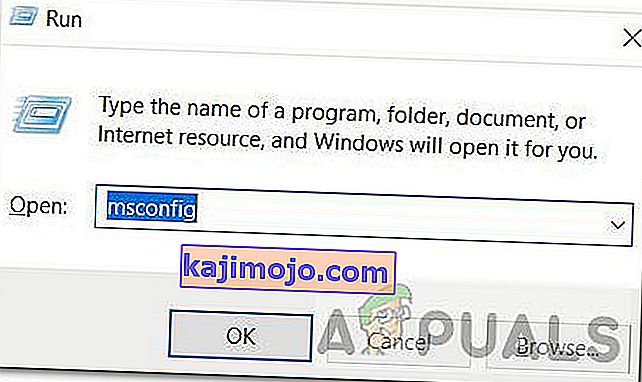
- Paina " Windows" + " R" käynnistääksesi suorituskehotteen.
- Kirjoita " MSCONFIG" ja paina " Enter" käynnistääksesi Microsoft-määritysikkunan.
- Napsauta tässä ikkunassa Palvelut- välilehteä ja poista valinta kohdasta Piilota kaikki Microsoft-palvelut
- Kun olet poistanut tämän vaihtoehdon valinnan, napsauta "Poista kaikki käytöstä" -painiketta ja napsauta "Käytä" tallentaaksesi muutokset.
- Sen jälkeen napsauta Käynnistys- välilehteä ja napsauta sitten Avaa tehtävänhallinta -painiketta käynnistääksesi tehtävienhallinnan.
- Napsauta Tehtävienhallinnassa kutakin käytössä olevaa sovellusta ja napsauta sitten Poista käytöstä -painiketta estääksesi sen käynnistymisen käynnistyksen yhteydessä.
- Käynnistä tietokone uudelleen käynnistääksesi sen vikasietotilaan.
- Tarkista vikasietotilassa, jäätyykö tehtäväpalkki jonkin ajan kuluttua tai jopa käynnistyksen yhteydessä.
- Jos tehtäväpalkki ei jääty tämän tilan sisällä, se tarkoittaa, että kolmannen osapuolen sovellus tai palvelu aiheutti ongelman.
- Aloita mahdollistaa sovellusten yksi kerrallaan ja tarkista, kumpi tekee asiasta palata.
- Jos kaikki sovellukset ovat kunnossa, aloita palvelujen käyttöönotto yksitellen ja tarkista, kumpi saa ongelman palaamaan.
- Pidä ongelmallinen palvelu / sovellus poissa käytöstä tai yritä asentaa / päivittää se uudelleen.


Tapa 10: Järjestelmän palauttaminen
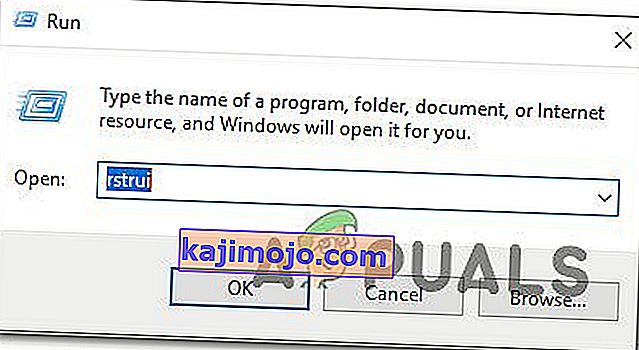
Some users found that performing a simple restore to an earlier working date fixed their issue but you will have to carefully select the restore point to which you will be restoring. It is recommended that you manually go through this process instead of using the automatic restore. In order to perform this step, follow the guide below.
- Press “Windows” + “R” to open the Run prompt.
- Type in “rstrui” and press “Enter” to open the restore management window.
- Click on “Next” and check the “Show more Restore Points” option.
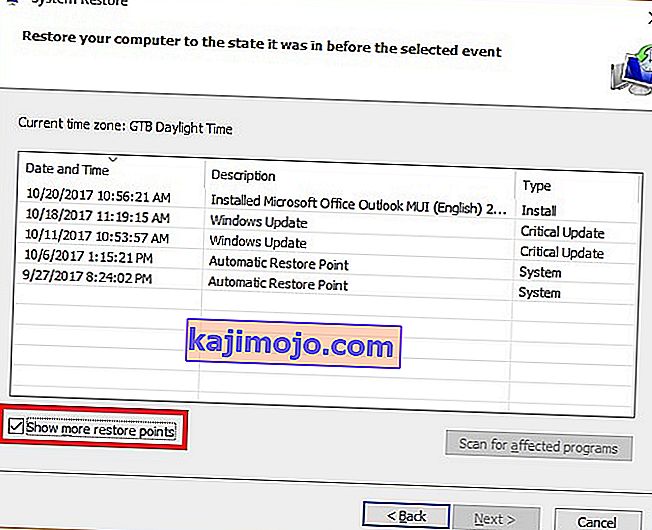
- Select a restore point in the list that is older than the date on which this issue started occurring on your computer.
- Click on “Next” again and follow the on-screen instructions to restore everything back to the date which you selected from the restore window.
- Check to see if doing so fixes the issue with the frozen taskbar.


Method 11: Toggle System Icons
It is possible in some cases that the system icon setting might be glitched on your computer due to which this issue is being triggered. Therefore, in this step, we will be toggling these icons and then we will check to see if doing so fixes the issue. For that:
- Press “Windows” + “I” to open the settings and click on the “Personalization” option.
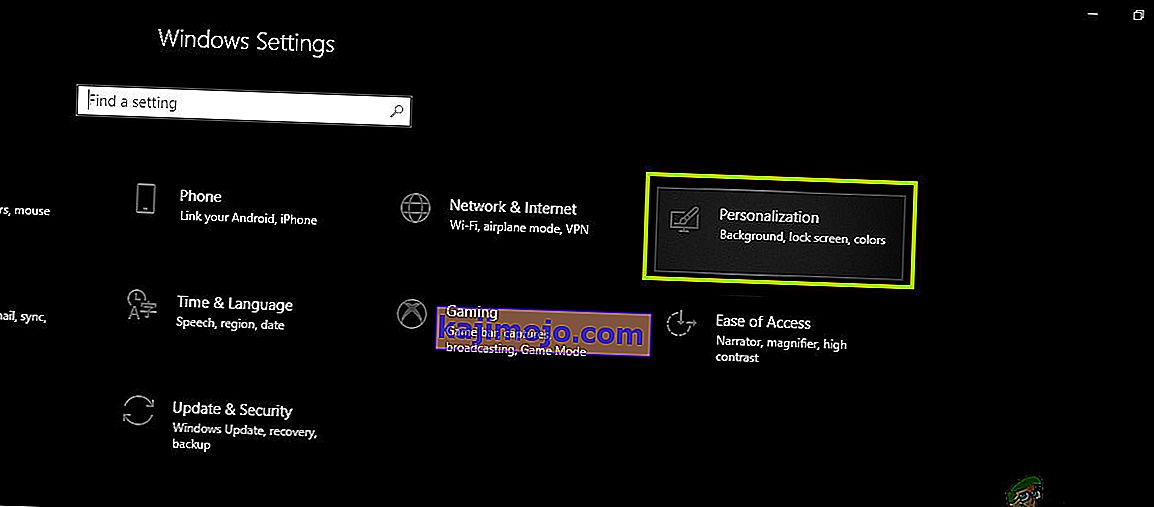
- From the left side, click on the “Taskbar” button.
- Under the “Notifications Area” heading, click on the “Turn System Icons on or off” button.
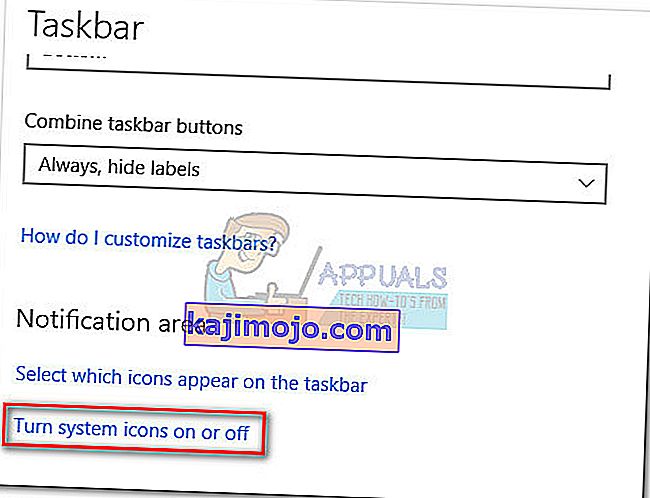
- Toggle all of the icons in the next window one by one by turning them off for a couple of seconds and then turning them back on.
- After completing this process, navigate back to the desktop by closing out of this window.
- Check to see if doing so has fixed the issue.


Method 12: Run Windows Maintenance Troubleshooter
It is possible that there might be some leftover files on your computer due to which there is a shortage of system paging memory or if there are leftover shortcuts from certain applications, that can also prevent the taskbar from functioning correctly. Therefore, in this step, we will be running the Windows Maintenance Troubleshooter and then check to see if doing so fixes this issue. For that:
- Press “Windows’ + “R” to open the Run prompt.
- Type in “Control Panel” and press “Enter” to launch the classical control panel interface.

- Click on the “View By:” option from the top and select the “Large Icons” option from the menu.
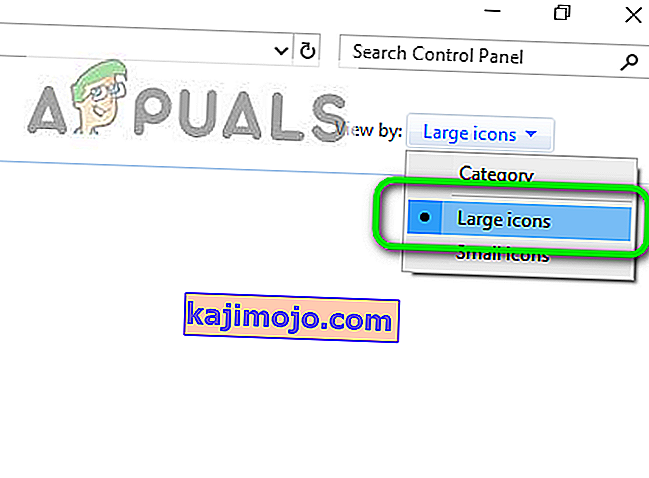
- In the next window, click on the “Troubleshooting” option and then click on the “Run Maintenance Tasks” button.
- In the window that pops up, click on the Next button, and provide administrative privileges to successfully run this task.
- Wait for the Maintenance to be completed and check to see if doing so has fixed the issue with the frozen taskbar.


Method 13: Use DDU to Perform a Clean Install
In some cases, it is possible that the Graphics Card installed on the system might have a faulty driver installed due to which this issue is being triggered. Therefore, in this step, we will be performing a Clean install of the Graphics Driver by uninstalling the Driver using DDU and then we will check to see if doing so has fixed the issue with the Taskbar. For that:
- Make sure to back up any important data before performing this step in case something goes unexpected.
- Download the DDU software from this website.
- After downloading the software, extract the zip file and open the folder where it has been extracted.
- Run the “.exe” file inside the folder and it will automatically further extract inside the same folder.
- Open the newly extracted folder and click on the “Display Driver Uninstaller.exe”.
- Click on the “Select Device Type” dropdown and select “GPU”.
- In the other dropdown, select the manufacturer of your GPU and then click on the “Clean and do not Restart” option.
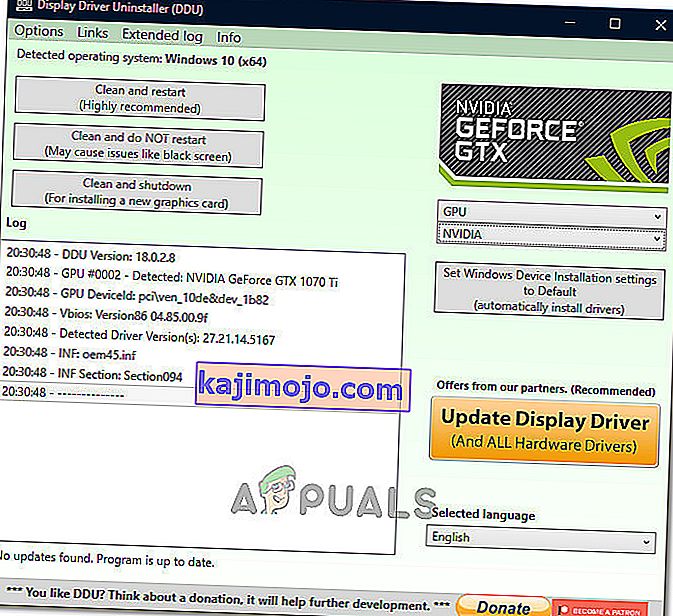
- This will uninstall the device driver for your GPU and it should automatically shift to the Microsoft Basic Visual Adapter.
- After uninstalling this software, download the GPU driver from your manufacturer’s website by specifying your exact make and model.
- Install this software on your computer and then check to see if doing so fixes the taskbar freezing issue on your computer.

Method 14: Stopping Windows Service
In some situations, it is possible that a certain Windows service might need to be stopped from the task manager. Therefore, in this step, we will be preventing it from running in the background as it has likely hanged due to which the taskbar is being frozen. In order to stop this service:
- Press “Windows’ + “R” to open the Run prompt.
- Type in “taskmgr” and press “Enter” to open the Task Manager.
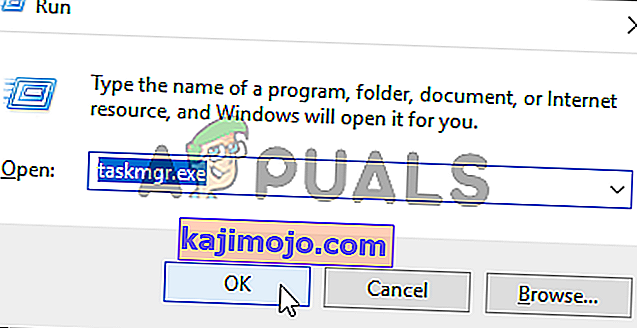
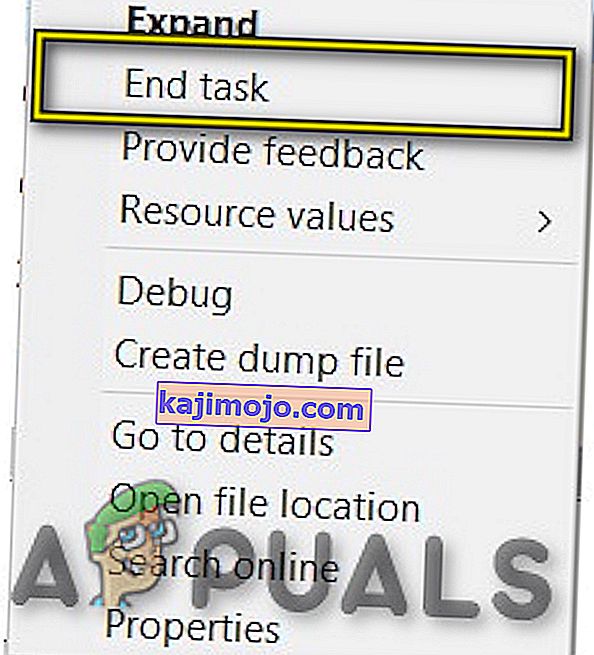
- Click on the “Processes” tab and from the list, click on the “Service Host: DCOM Server Process Launcher” service.
- Click on the “End Task” button and close out of the task manager.
- After closing out of the task manager, check to see if doing so has fixed the frozen taskbar situation.

Method 15: Stop Microsoft Edge and Remove it from Taskbar
In some situations, the default browser that comes installed with Microsoft Windows might just be the culprit behind this whole issue. If you are using another browser as your go-to default browser, you might see that using the Microsoft Edge browser causes issues with the taskbar. Therefore, in this step, we will be stopping Microsoft Edge from the Task Manager and then we will remove it from the taskbar. For that:
- Press “Windows’ + “R” to lauch the Run prompt.
- Type in “taskmgr” and press “Enter” to open the Task Manager.
- Click on the “Processes” tab and from the list, click on the “Microsoft Edge” browser.
- Click on the “End Task” button and close the task manager.
- If the Taskbar is still frozen, restart your computer and repeat this process.
- After doing so, right-click on the Microsoft Edge icon in the taskbar.
- Select the “Unpin from Taskbar” option to remove Microsoft Edge from your taskbar.
- Check to see if doing so fixes the issue.

Method 16: Remove Outdated References
It is possible that your Registry might be plagued with outdated references to an old operating system that you might’ve upgraded from. Even if you have removed the Windows.old folder from your computer, some driver and registry files might still be associated with the “Windows.old” folder which practically doesn’t exist on your computer and this misconfiguration might prevent your computer from working properly. Therefore, in this step, we will be removing it from the registry editor. For that:
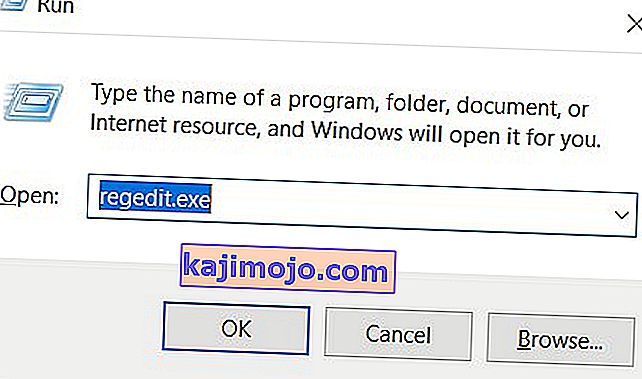
- Press “Windows’ + “R’ to open the Run prompt.
- Type in “regedit” and press “Enter” to open the registry editor.
- Press “Ctrl” + “F” to open the finder and type in the “c:\windows.old” line and press “Enter” to find any registry related entries.
- Delete or remove any such entries that refer to this and run an SFC scan to check for any missing files.
- Make sure to install any missing drivers using Driver Easy and then check to see if the Frozen Taskbar issue has been fixed.

Method 17: Rollback Updates
In some situations, Windows might’ve acquired some updates that are preventing your computer from functioning properly and due to this, the taskbar feature has been broken. Therefore, in this step, we will be rolling back some recently installed updates and then we will check to see if doing so fixes the frozen taskbar issue. In order to do that:
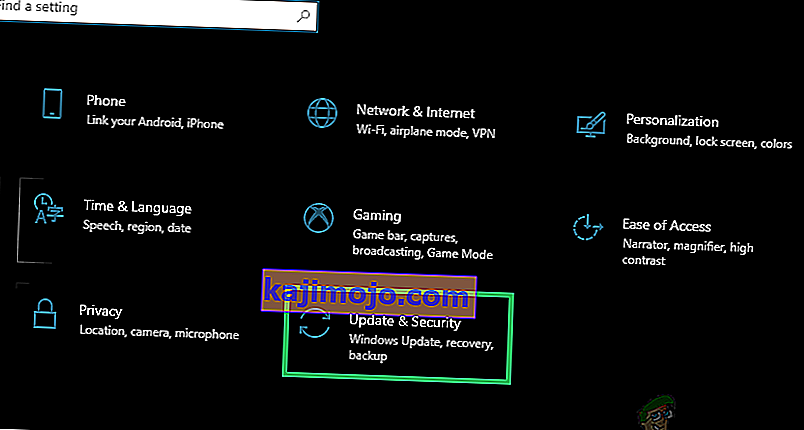
- Press “Windows’ + “I” buttons on your keyboard to open the Windows settings.
- In the Windows Settings, click on the “Update and Security” button and from the left pane, select “Windows Update”.
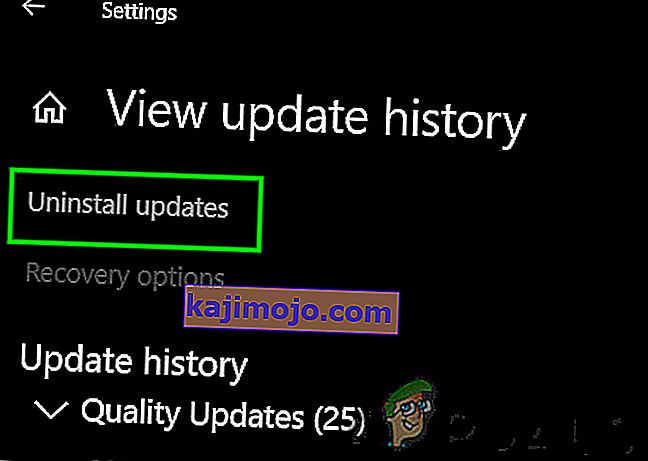
- On the next screen, select the “Update History” button and it should lead to a new window.
- In the new window, there should be an “Uninstall Updates” button and by clicking on it, a prompt should open that should enable you to be able to uninstall an update.
- Follow the on-screen instructions to be able to fully remove the update and check to see if the issue persists after doing so.


Method 18: Signing out of Account
It is possible that the Windows Taskbar is getting frozen due to a glitch during the account login. Therefore, we can test this out by simply signing out of our account and then signing back in to ensure that the account is logged in properly and that it is properly registered with the Microsoft Servers. In order to do so:
- Press “Ctrl” + “Alt” + “Del” buttons on your keyboard to open up the account options.
- Click on the “Sign out” option from the screen to log out of your account.
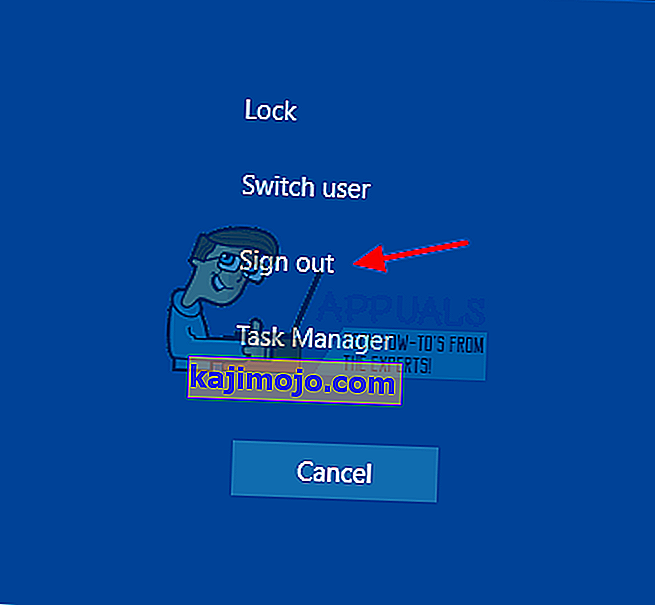
- Wait for Windows to completely sign you out of your account and confirm any prompts on your screen to complete the sign-out process.
- Select your account and sign back into your account from the next screen by entering your login details.
- Check to see if doing so has fixed the frozen taskbar issue on your account.

Method 19: Creating Batch File
Most people found that restarting the Windows Explorer fixed their issue but for some of them, it kept coming back after a while. Therefore, in this step, we figured out a way for the people that can solve it by restarting but all they will have to do is click on a batch file present on their desktops. For that:
- Right-click anywhere on your desktop and select the “New>” option.
- Click on the “Text Document” option and a new text document will be created on your desktop.
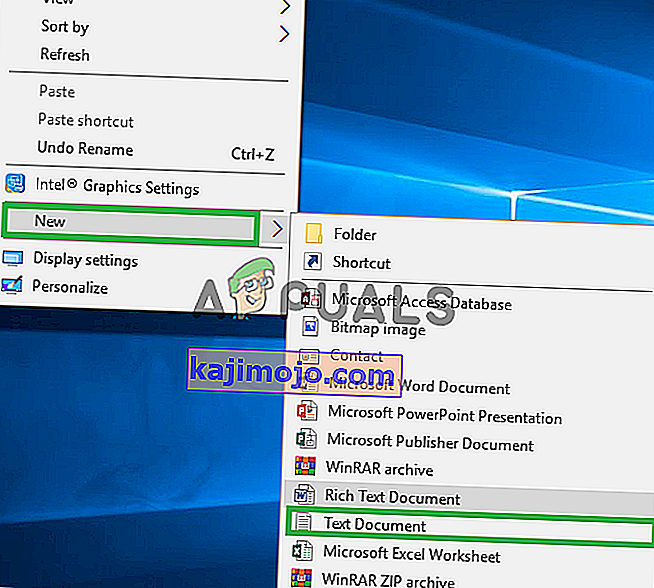
- Open this text document and paste the following lines inside of the text document.
taskkill /f /IM explorer.exe start explorer.exe exit
- Click on the “File” option at the top left of the window and select the “Save As” option.
- Enter the “TaskMRestart.bat” as the file name and select “All Files” from the “File Type” dropdown.
- Save this file on your desktop and exit out of the document.
- Now, double-clicking on this newly saved file should automatically restart File Explorer which should fix the Frozen taskbar issue within a second.
- You can just click on the file whenever the taskbar freezes and it should fix itself.

Method 20: Perform an Update
The frozen taskbar issue was a very famous topic on most Microsoft forums and apparently a lot of Microsoft officials took note of it. Therefore, it is possible that this issue might’ve been fixed for some people in recent updates released by Microsoft. Therefore, in this step, we will be checking for any available updates from Microsoft and installing them on our devices. For that:
- Press “Windows” + “I” to open the settings.
- In the settings, click on the “Update and Security” option and then select the “WindowsUpdate” button from the left side.
- In the Windows Update, click on the “Check for Updates” button and a prompt will be registered that will automatically check for any newly available updates.
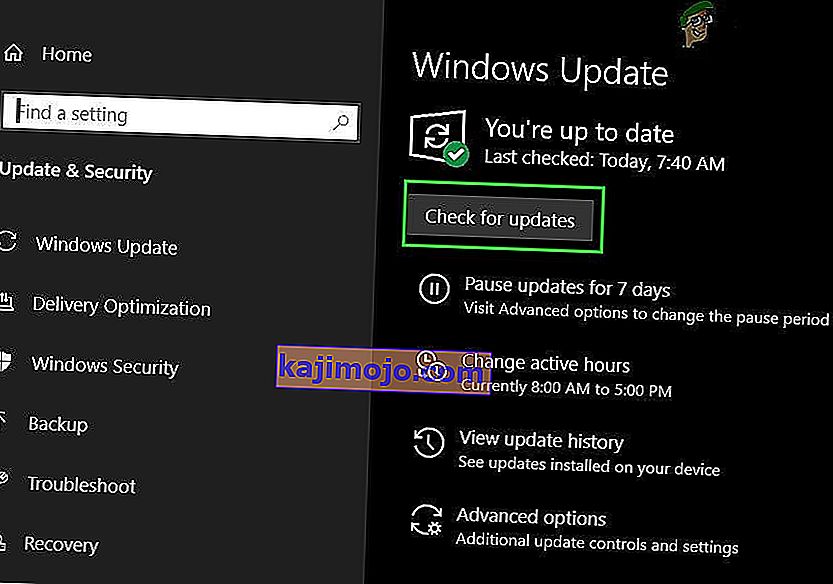
- Install these updates on your computer by following the on-screen instructions and restart your computer.
- Check to see if installing these updates fixes the issue on your computer.

Method 21: Unpinning Items from Start Menu
Some people like to pin important items to the start menu for ease of access and increased productivity. However, as it stands, some Windows users have been facing the frozen taskbar issue due to these pinned items. Therefore, in this step, we will be unpinning some items from the start menu and the taskbar and then we will check to see if doing so fixes the frozen taskbar bug.
- Press the “Windows” button on your keyboard to launch the start menu.
- Inside the start menu, right-click on a tile on the right side of the start menu.
- Select the “Unpin from Start Menu” button to remove the item from the Start menu tiles.
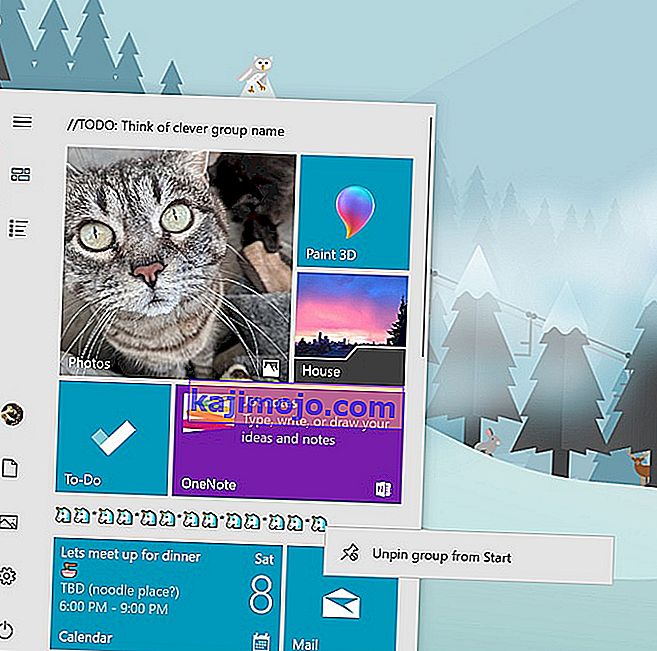
- After removing some items, check to see if the bug is fixed.
- Try removing all the items that can be removed if the bug comes back and check again.
- For a more accurate removal, try removing all the programs from the taskbar and the Start menu that try to connect to the internet, for example, Microsoft Edge, Cortana, News, etc.

Method 22: Disable Items from Bios
It is possible in some cases that the computer’s Bios has been improperly configured due to which the Windows Taskbar is getting frozen time and time again. Therefore, in this step, we will first be booting inside the Bios from which we will disable an option that should get rid of this problem if it was based around the Bios. In order to do so:
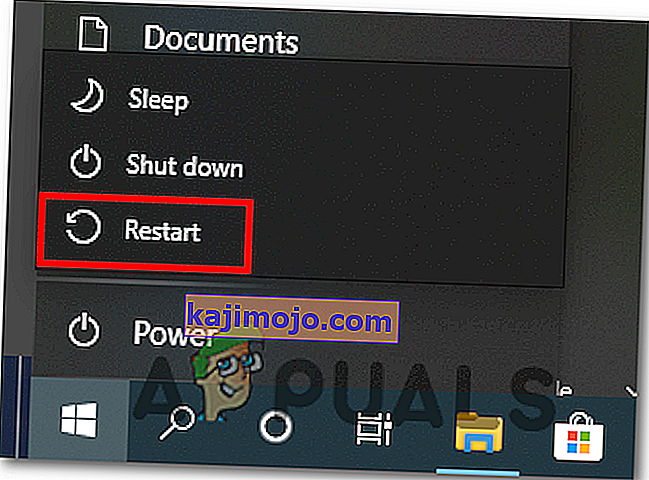
- Press the “Windows” button on your keyboard and click on the “Power Button” icon.
- Select the “Restart” option from the list and wait for your computer to prompt a restart.
- When the computer shuts down and starts booting up, start pressing the “Del”, “F12” or “F11” key depending upon your motherboard to boot inside the computer’s bios.
- From the bios, navigate through different settings until you find the “iGPU Multi-Monitor” feature.
- Disable this feature inside the Bios and boot back into Windows.
- Check to see if disabling this feature worked and fixed the frozen taskbar error.
