Jotkut Windows-käyttäjät eivät pysty etsimään ja lataamaan uusia päivityksiä käyttöjärjestelmäänsä. Eniten vaikuttaneet käyttäjät ilmoittavat päivitysten lataamisen alkavan, mutta prosessi ei koskaan pääty loppuun ja virhekoodi 8024A000 näytetään. Virhekoodin mukaan tämä virhe ilmenee, kun Windows Update yrittää estää päivitysistunnon keskeyttämisen tärkeän tehtävän suorittamisen aikana. Tämä ongelma ei ole yksinomaan tietylle Windows-versiolle, koska sen ilmoitetaan esiintyvän Windows 10: ssä, Windows 8.1: ssä ja Windows 7: ssä.

Mikä aiheuttaa Windows Update -virhekoodin 8024A000?
Tutkimme tätä ongelmaa tarkastelemalla erilaisia käyttäjäraportteja ja analysoimalla useita tämän virhekoodin suosituimpia korjauksia. Kuten käy ilmi, on olemassa useita erilaisia mahdollisia syyllisiä, jotka saattavat aiheuttaa tämän ongelman:
- Windows Update -häiriö - Tämä ongelma voi johtua toistuvasta WU-ongelmasta. Tietyissä olosuhteissa päivityskomponentti jumittuu eikä pysty asentamaan uutta odottavaa päivitystä. Tällöin Windows Update -vianmäärityksen pitäisi pystyä ratkaisemaan ongelma automaattisesti sovellettavien korjausstrategioiden soveltamisen jälkeen.
- Windows-päivityspalvelu on jumissa huonossa tilassa - Kuten käy ilmi, tämä ongelma voi ilmetä myös, jos yhtä tai useampaa Windows-palvelua ei käynnistetä tai pysäytetä. Jos tämä skenaario on käytettävissä, sinun pitäisi pystyä ratkaisemaan ongelma käyttämällä korotettua CMD-kehotetta pysäyttämään ja käynnistämään kaikki mukana olevat palvelut väkisin.
- WU: hon liittyviä DLL-tiedostoja ei ole rekisteröity oikein - Windows Update luottaa kymmeniin Dynamic Link Library -tiedostoihin etsiessään ja asennettaessa odottavia päivityksiä. Tässä tapauksessa sinun pitäisi pystyä ratkaisemaan ongelma rekisteröimällä asiaankuuluvat DLL-tiedostot uudelleen korotetusta komentokehoteikkunasta.
- Järjestelmätiedostojen vioittuminen - Järjestelmätiedostojen vioittuminen voi myös olla vastuussa tästä virheilmoituksesta. Kun yksi vioittunut tiedosto voi tehokkaasti rikkoa koko WU-komponentin. Jos tämä skenaario on käytettävissä, sinun pitäisi pystyä ratkaisemaan ongelma korjaamalla vioittuneet tiedostot järjestelmätiedostojen tarkistajan tai DISM: n avulla.
- RST-ohjain puuttuu Windowsin asennuksesta - Tämä ongelma voi ilmetä myös, jos tietokoneeltasi puuttuu Rapid Storage Technology -ohjain tai jos se käyttää erittäin vanhentunutta versiota. Useat ongelmat saaneet käyttäjät ovat onnistuneet ratkaisemaan ongelman asentamalla RST-ohjaimen uusimman version.
- Kolmannen osapuolen AV sulkee Windows Updaten käyttämiä portteja - Osoittautuu, että jotkut kolmannen osapuolen AV-työkalut ovat niin suojaavia, että niillä on taipumus sulkea Windows Updaten käyttämät lailliset portit. McAfee Total Protection, AVAST ja Comodo ovat tämän luettelon kärjessä, mutta voi olla muita. Tässä tapauksessa sinun pitäisi pystyä ratkaisemaan ongelma poistamalla kolmannen osapuolen paketti ja käyttämällä sisäänrakennettua ratkaisua (Windows Defender).
Jos yrität parhaillaan ratkaista tätä virheilmoitusta, tämän artikkelin pitäisi ohjata sinut oikeaan suuntaan. Alta löydät muutaman mahdollisen korjauksen, joita muut samanlaisessa tilanteessa olevat käyttäjät ovat onnistuneesti käyttäneet ongelman ratkaisemiseen.
Jotta pysyisit mahdollisimman tehokkaana, suosittelemme, että noudatat alla olevia menetelmiä niiden esitysjärjestyksessä ja hylkäät vaiheet, joita ei sovelleta skenaarioosi. Lopulta sinun pitäisi löytää korjaus, joka ratkaisee ongelman omassa tapauksessasi riippumatta syyllisestä, joka aiheuttaa sen.
Tapa 1: Suorita Windows Update -vianmääritysohjelma
Jos kohtaat tämän ongelman, sinun on aloitettava suorittamalla Windows Update -vianmääritysohjelma. Useat ongelmat ovat onnistuneet ratkaisemaan ongelman pakottamalla Windows Update -vianmääritysohjelman korjaamaan virhekoodin 8024A000 automaattisesti .
Useat käyttäjät, joita asia koskee, ovat ilmoittaneet, että ongelma on ratkaistu sen jälkeen, kun he olivat suorittaneet Windows Update -vianmääritysohjelman ja käynnistäneet tietokoneen uudelleen. On mahdollista, että Windows-versio sisältää korjausstrategian tälle virheelle. Jos näin on, vianmääritysohjelma käyttää korjausstrategiaa automaattisesti, ja voit korjata ongelman vain muutamalla napsautuksella.
Tässä on pikaopas Windows Update -vianmäärityksen suorittamisesta:
- Paina Windows-näppäin + R avaa Suorita -valintaikkuna. Kirjoita sitten tekstikenttään ” control.exe / name Microsoft.Troubleshooting ” ja paina Enter avataksesi Asetukset- sovelluksen Vianmääritys- välilehden .
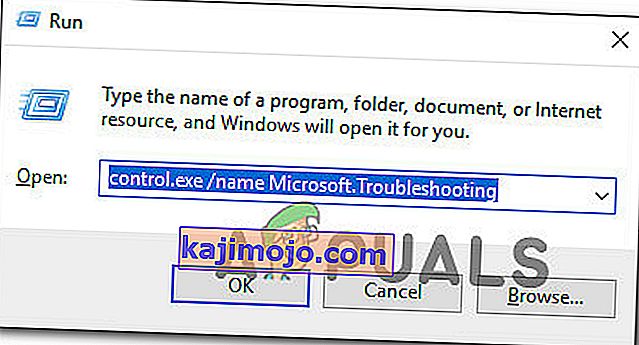
- Kun olet Vianmääritys-välilehdessä, vieritä alas ylös ja käynnistä -välilehdelle ja napsauta Windows Update . Napsauta sitten uudesta valikosta Suorita vianmääritys .
- Odota, kunnes ensimmäinen tarkistus on valmis, ja napsauta sitten Käytä tätä korjausta, jos löytyy toimiva korjausstrategia.
- Jos korjaus on asennettu, käynnistä tietokone uudelleen ja tarkista, onko ongelma ratkaistu, kun seuraava käynnistysjakso on valmis.

Jos sama virhekoodi 8024A000 esiintyy edelleen yritettäessä asentaa Windows Update, siirry seuraavaan seuraavaan tapaan.
Tapa 2: Käynnistä Windows Update -palvelut uudelleen
Kuten käy ilmi, tämä erityinen ongelma voi ilmetä myös Windows Update -palvelun takia, joka jumiutuu epäselvään tilaan (sitä ei ole käynnistetty eikä pysäytetty). Useat asianomaiset käyttäjät ovat ilmoittaneet, että he pystyivät ratkaisemaan ongelman käynnistämällä kaikki WU (Windows Update) -komponentin käyttämät palvelut uudelleen.
Tämän menettelyn on vahvistettu olevan tehokas kaikissa uusimmissa Windows-versioissa (Windows 7.1, Windows 8.1 ja Windows 10)
Tässä on pikaopas siitä, miten tämä tehdään:
- Paina Windows-näppäin + R avata Suorita -valintaikkuna. Kirjoita seuraavaan näyttöön tekstiruudun sisällä ”cmd” ja paina Ctrl + Vaihto + Enter avataksesi korotetun komentokehotteen. Kysyessä sitä UAC (User Account Control) , napsauta Kyllä myöntää järjestelmänvalvojan oikeudet.
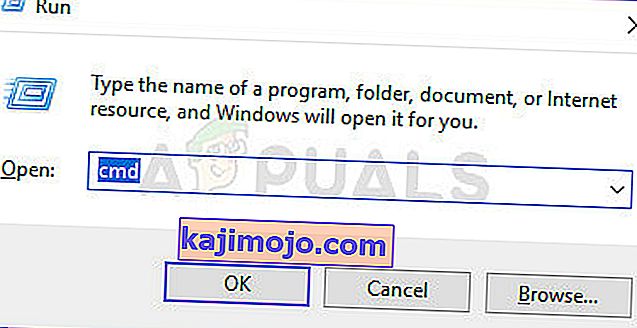
- Kun olet korotetun CMD-kehotteen sisällä, kirjoita seuraavat komennot järjestyksessä ja paina Enter jokaisen jälkeen käynnistääksesi kaikki Windows Update -palvelut:
nettopysäytys wuauserv nettopysäytysbitit nettopysäytyskryptsvc
- Kun hyvin WU-palvelu on lopetettu, kirjoita seuraavat komennot ja paina Enter jokaisen jälkeen palvelujen uudelleenkäynnistämiseksi:
nettokäynnistys wuauserv nettokäynnistysbitit nettokäynnistyssalakirjat poistuvat
- Once the procedure is complete, restart your computer and see if the issue is resolved once the next startup sequence is complete.

If the same Error Code 8024A000 is still occurring when you try to install a pending Windows update, move down to the next method below.
Method 3: Re-registering DLLs associated with Windows Update
As it turns out, it’s also possible that the reason for the constant 8024A000 Error Codes is a DLL (Dynamic Link Library) file that is no longer registered correctly. This is typically reported to occur on older Windows version and usually occurs due to corruption or after a security scanner quarantines some items due to a virus infection.
If this scenario is applicable to your current situation, here’s a quick guide on how you can re-register the DLLs pertaining to WU (Windows Update) in order to fix the 8024A000 Error Codes:
- Press Windows key + R to open up a Run dialog box. Then, type “notepad” in the text box and press Ctrl + Shift +Enter to open up a Notepad window with elevated access. When prompted by the UAC (User Account Control)
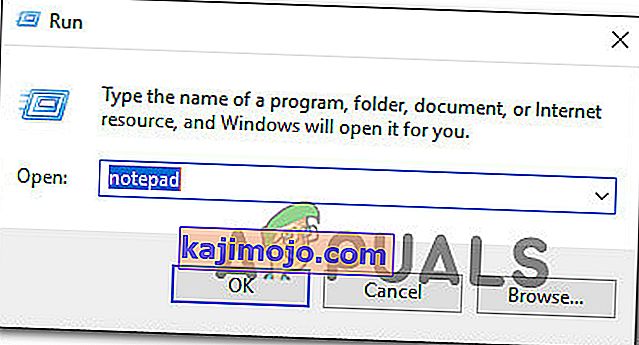
- Inside the new Notepad document, paste the following commands:
regsvr32 c:\windows\system32\vbscript.dll /s regsvr32 c:\windows\system32\mshtml.dll /s regsvr32 c:\windows\system32\msjava.dll /s regsvr32 c:\windows\system32\jscript.dll /s regsvr32 c:\windows\system32\msxml.dll /s regsvr32 c:\windows\system32\actxprxy.dll /s regsvr32 c:\windows\system32\shdocvw.dll /s regsvr32 wuapi.dll /s regsvr32 wuaueng1.dll /s regsvr32 wuaueng.dll /s regsvr32 wucltui.dll /s regsvr32 wups2.dll /s regsvr32 wups.dll /s regsvr32 wuweb.dll /s regsvr32 Softpub.dll /s regsvr32 Mssip32.dll /s regsvr32 Initpki.dll /s regsvr32 softpub.dll /s regsvr32 wintrust.dll /s regsvr32 initpki.dll /s regsvr32 dssenh.dll /s regsvr32 rsaenh.dll /s regsvr32 gpkcsp.dll /s regsvr32 sccbase.dll /s regsvr32 slbcsp.dll /s regsvr32 cryptdlg.dll /s regsvr32 Urlmon.dll /s regsvr32 Shdocvw.dll /s regsvr32 Msjava.dll /s regsvr32 Actxprxy.dll /s regsvr32 Oleaut32.dll /s regsvr32 Mshtml.dll /s regsvr32 msxml.dll /s regsvr32 msxml2.dll /s regsvr32 msxml3.dll /s regsvr32 Browseui.dll /s regsvr32 shell32.dll /s regsvr32 wuapi.dll /s regsvr32 wuaueng.dll /s regsvr32 wuaueng1.dll /s regsvr32 wucltui.dll /s regsvr32 wups.dll /s regsvr32 wuweb.dll /s regsvr32 jscript.dll /s regsvr32 atl.dll /s regsvr32 Mssip32.dll /s
- Once you pasted the commands, go to File (from the ribbon menu at the top) and click on SaveAs.
- From the Save As window, name the file whatever you want but make sure to set the extension of the File Name to .bat. We saved it WindowsUpdateRegister.bat. Then, select a convenable location and click on Save.
- Double-click on the newly created BAT file and click Yes at the confirmation prompt. If you’re also prompted by the UAC (User Account Control) click Yes to grant admin access.
- Once the DLL files have been re-registered, restart your computer and see if the issue has been resolved once the next startup sequence is complete.


If the 8024A000 issue is still occurring, move down to the next method below.
Method 4: Performing SFC and DISM Scans
This particular issue can also occur due to some degree of system file corruption. Although the issue is less common on Windows 10, it’s still possible to get this error code due to some corrupted system file even if you’re system is up to date.
Both DISM (Deployment Image Servicing and Management) and SFC (System File Checker) are built-in utilities capable of repairing system files. The only difference is they do it in different ways.
While SFC scans and repairs system files by replacing corrupted files with locally stored copies, DISM relies on Windows Update to fix corruption. That’s why it’s important to start this procedure with the SFC scan – if WU has a corruption problem, the System File Checker should resolve it, allowing you to use DISM effectively.
Here’s a quick guide on running an SFC and DISM scan from an elevated Command Prompt:
- Press Windows key + R to open up a Run dialog box. Then, type “cmd” inside the text box and press Ctrl + Shift + Enter to open up an elevated Command Prompt. When you’re prompted by the UAC (User Account Control), click on Yes to grant administrative privileges.
- Once you’re inside the elevated Command Prompt, type the following command and press Enter immediately to start the SFC scan:
sfc /scannow
Note: Keep in mind that once you start this process, there’s no way to stop it without running the risk of producing even more disk errors. Be patient and don’t close the CMD window or attempt to restart your computer.
- When the procedure is complete, you can safely close the elevated command prompt and restart your computer to see if the issue has been resolved at the next system startup.
- If the same issue is still occurring even after you’ve performed the SFC scan, follow step 1 again to open another elevated Command Prompt. Then, type the following command and press Enter to perform a DISM scan:
DISM /Online /Cleanup-Image /RestoreHealth
Note: DISM requires a stable Internet connection in order to be able to download fresh copies of the files that are affected by corruption.
- Once the scan is finished, perform one final restart and check if the issue has been resolved once the next startup sequence is complete.
Method 5: Instaling the Intel Rapid Storage Technology Driver (if applicable)
Another possible culprit that might end up causing the 8024A000 error code is a missing our updated Intel Rapid Storage Technology Driver. Several affected users have reported that the issue was no longer occurring after they installed the latest version of this driver and restarted their computer.
Based on our investigations, this scenario is mostly reported to occur in instances where the user is encountering the issue on Windows 7 or below. If this is applicable, follow the steps below to install the latest driver of Intel Rapid Storage:
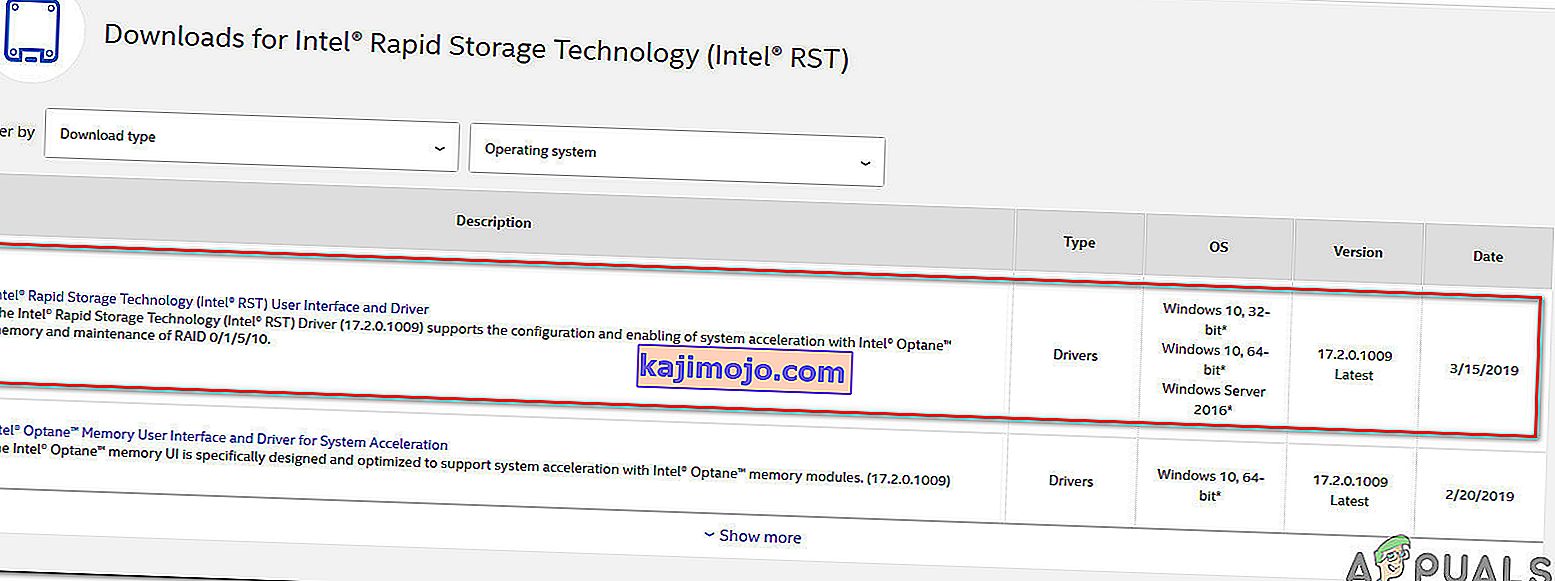
- Visit this link (here) and click on Intel Rapid Storage Technology *RST) User Interface and Driver to initiate the download.
- Once the download is complete, open the installation executable and follow the on-screen prompts to complete the installation of the latest RST driver.
- Restart your computer once the driver is installed and see if the issue has been resolved once the next startup sequence is complete.

If you’re still encountering the 8024A000 Error Code, move down to the next method below.
Method 6: Uninstalling 3rd party AV
As it turns out, it’s also possible that the issue is actually being caused by an overprotective 3rd party AV suite. Several affected users have reported that the issue was resolved after they uninstalled the 3rd party security scanner and reverted back to the default AV (Windows Defender).
McAfee Total Protection, AVAST, and Comodo are commonly reported as being responsible for causing the 8024a000. Users are speculating that the issue occurs because the AV ends up blocking some ports that are actually being used by the WU component.
UPDATE: Based on several user reports, this issue can also be caused by the premium version of Malwarebytes. If you’re using a premium subscription for Malwarebytes, you should be able to resolve the issue by disabling Ransomware protection from the Settings menu.
If you’re suspecting that your third-party AV/firewall is causing the issue, follow the steps on this article (here) to completely uninstall your AV suite without leaving any remnant files.
If this scenario is not applicable or the issue is still occurring even after you’ve uninstalled your 3rd party AV suite, move down to the next method below.
Method 7: Performing a repair install
If none of the methods above have helped you to resolve the issue, a repair install should end up repairing the Windows Update problems. This procedure will reset all Windows components, including booting-related processes.
However, it does things a bit more efficiently than a classic clean install in the sense that it allows you to keep all personal data including photos, videos, applications, and games). The only thing that will get deleted and replace are all Windows components – which is exactly what you need.
In case you want to go for a repair install, you can follow the instructions on this article (here) for step by step instructions on how to do this efficiently.